How To Ceiling Mount A Projector
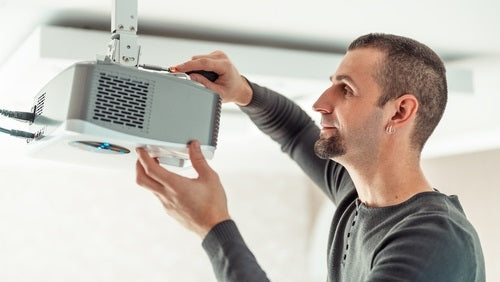
When people picture home theater projectors they typically think of them with a ceiling mount. There’s a good reason for this. Mounting your projector on your ceiling will give your home theater area a more polished and professional look. Plus it’s the best way to save space in your media room and protect your equipment.
When using a projector ceiling mount you’ll need to consider a number of measurements such as your screen size and room size, as well as your projector’s specific throw distance and vertical offset. You’ll also need to consider the size of your projector to buy a sturdy enough mount. These measurements will help you know what kind of projector mount to get and where to place it.
When you’re buying your projector, you can talk to one of our projection experts who can help you determine the best projector and mount combo. Give us a call at 888-392-4814
Use this guide for how to ceiling mount a projector to make sure you install the mount correctly, so you enjoy watching TV and movies for years to come.
Why Ceiling Mount A Projector?
Using a projector with a ceiling mount makes it easy to adjust the throw ratio/distance as you can place the mount where you want it in order to get the desired image size. A ceiling-mounted projector also keeps it out the way of people walking past. By having it attached to the ceiling, the projector can't be bumped out of position or worse, knocked over! If you have a regular throw projector, it just makes sense to mount it to the ceiling.
Types of Projector Ceiling Mounts
There are three types of projector ceiling mounts, above ceiling mounts, below ceiling mounts and projector lifts. The type of ceiling you have and the projector you bought will help determine what type of ceiling mount you need.
Above Ceiling Projector Mounts
As the name implies, above ceiling projector mounts have their anchor above the ceiling line. These are typically used for large, heavy projectors as above ceiling mounts give you a more secure placement. Above ceiling projector mounts are usually supported by 2x4 planks or other structural support in the crawlspace between floors or above the tiles of a drop ceiling.
Below Ceiling Projector Mounts
Below ceiling projector mounts have their anchor on the underside of the ceiling. These are best used for smaller or lighter projectors. Below ceiling mounts should be mounted to a ceiling joist to ensure they are securely fastened.
Projector Lifts
A projector lift is a shelf that holds the projector in place and can retract into the ceiling when not in use. These motorized mounts are positioned above the ceiling and descend at the push of a button or flip of a switch. They can also be connected to the projector via a 12V trigger to come down or go up when you turn on the projector.
How To Mount A Projector To The Ceiling
Warning: Before installing a projector with a ceiling mount make sure the mount is rated to support the weight and size of your projector.
Things You'll Need
- Projector
- Mount Kit
- Ladder or Step Ladder
- Drill
- Screwdriver
- Wrench or Allen Wrench (depending on the mount)
- Tape Measurer
- Pencil
Step 1: Determine the position of your projector to your screen
First you need to decide where you want to position your projector screen and your projector. You can use this guide on how to design a home theater that goes into detail about where to place your projector screen.
Determine The Projector's Throw Distance
Make sure the throw distance between the projector and the screen is sufficient. The projector throw distance tells you how far the projector can be from the movie screen in order to fill it with a sharp in-focus image. You can use this projection calculator to help you determine if the video beamer is being mounted in the right place.
Determine The Projector's Vertical Offset
Vertical offset is how high or low the projector must be placed so the light from the projector shines at the proper angle to make the image on the screen. The vertical offset will be displayed as a percentage and can often be found in the specs under lens shift. Offset can either be positive or negative. A positive offset means the image will be projected above the lens while a negative offset will be projected under it.
As an example the Epson LS11000 has a vertical lens shift of -96.3% to +96.3%. This means the height of the projector can be 96.3% above the bottom or below the top of the screen.
You can use this formula to help determine how far above or below the center of the screen the lens should be. Total height of screen x percentage of offset = distance of lens above/below center of screen.
If you need to for very high ceilings, you can use extension columns that are a pipe that drops the position of the projector to the proper height.
Find The Center Line Of Your Projector Screen
When you have the cinema screen in place, measure the distance between the wall to the edge of the screen plus half the width of the screen. Now mark this measurement on the ceiling where you want your projector to go, measured from the other end of the same wall that you originally measured from.
If your projector has horizontal lens shift you won't need to place the projector mount right on the center line, as it will allow you to move it to the left or right of the center line.
Other Things To Consider
- Make sure your projector's beam is not blocked by any fans, lights or anything else hanging from the ceiling
- Try and position it nearer to a wall in order to make hiding the wires as easy as possible.
- If your projector fan is on the noisier side, you may want to not have the projector positioned directly above the seating area.
- When picking where to mount your projector, it's important to make sure you place your marker along a ceiling joist. Use your knuckles to tap the ceiling until you hear a solid sound in order to locate one. By attaching the mount to a joist you will get a much more secure mounting. You can also use the “blocking” method to attach a support, such as a 2x4, between two joists and attach your projector mount to this “block”, if there are no joists in the specific, desired location.
- Make sure your projector is placed far enough back to avoid hotspotting on the screen
Step 2: Attach the mount to the projector
Take your projector, carefully flip it upside down. Don’t worry projectors are built to be mounted upside down.
Loosely attach the mounting bracket according to the instructions that came with the mount.
Wherever possible, position the bracket so it's in line with the lens.
Your mount might either be attached to the ceiling directly or using an extension column of the desired length that then attaches to a ceiling plate.
When you're happy with the position, securely fasten the bracket down. If you're unable to bring the lens in line with the bracket, be sure to offset this distance when mounting it to the ceiling in order for the lens to be centered with the screen.
Now with the bracket in place, be mindful of where it's positioned on the projector and make any minor adjustments as to where it needs to be installed on the ceiling in order for it to stay along the center line of the projector screen and so it's not too close to any walls.
Step 3: Attach the mount to the ceiling
Making sure your mounting bracket can still be installed along a ceiling joist, make some marks where your screw holes need to go. Now use a drill to make a preliminary hole for each screw. Then securely fasten the mounting bracket to the ceiling. Ensure you use suitable screws of the right quantity according to the instructions for the bracket.
Check that it is securely fastened to the ceiling by trying to wiggle it around.
At this stage, take the projector and carefully place it on the bracket and check that you’re happy with its position.
It is a good idea with heavier projectors to have a second person holding it up to make sure it doesn’t fall.
Step 4: Wiring your projector
If you’ve installed an electrical outlet and wiring in your ceiling next to the projector you can just plug it in and enjoy some movies.
If you don’t have the outlet installed you’ll need to make sure you have a cable that’s long enough to reach the projector. A power cable extension may be necessary.
You will likely need to run an HDMI cable from your ceiling mounted projector to your media player or home theater receiver. Establish how long your cables need to be, but make sure you have extra length. Remember you won’t just be running the cables in a straight line from the projector to your video source, so you’ll want to account for the additional cabling you’ll need.
If you need to run more than 25ft of HDMI cable you may need to get an HDMI signal extender, as that is about the maximum length you can use without seeing a degradation in signal quality due to attenuation.
You can hide the wires using decorative trunking along the base of the wall or if you have the know-how you can run the wires through the ceiling and behind the walls.
Step 5: Aligning your projector
Now that you have your ceiling mounted projector set up, you’ll need to align the image with the screen.
To align your projector and screen you’ll likely need to adjust the zoom and focus on the projector itself. If the projected picture is skewed you’ll need to adjust the roll, pitch and yaw of the projector on the mount.
You can use horizontal and vertical lens shift to center the image onto your projector screen
If you need more help, you can follow this detailed guide for how to align a projector.
What if you have a beam or a fan in the way?
Don’t worry if there is something on your ceiling obstructing the projector from being aligned with the center of the cinema screen. Almost all quality made projectors have some level of horizontal lens shift. This allows you to position the projector off axis with the projection surface while still making a rectangular image.
Problem With Ceiling Mounting A Projector.
A projector needs a power source to turn on and a media player connected to it to show content. The problem is, most people don't have a power supply in the ceiling where the projector will be placed. And if you're building your own DIY media room you won't want to be ripping out floorboards or cutting holes in your ceiling to run the HDMI cables and power cables.
With some decorative trunking and some spatial thinking you can hide the wires pretty easily. If you don’t want to ceiling mount your projector you may consider using a shelf at the back of the room.
Alternatively instead of getting a regular throw projector, you can instead buy an ultra short throw projector that sits directly under the movie screen.
How Much Do Projector Mounts Cost?
Projector mounts can cost anywhere from $20 for a basic mount to $700 for a entire mounting kit. Some motorized projector lifts can cost $3,750. This large price discrepancy depends on the quality of the mount, how much weight it can support and how adjustable the mount is. For home theater projectors you'll want to look to spend between $150 to $300 on your mount.
The low cost mounts are very limited to smaller portable projectors. If you're tempted to save money buying a cheaper projector mount for your home theater, ask yourself how confident you are that a $20 projector mount will hold your new $3,500 projector.
When you’re buying your projector, you can talk to one of our projection experts who can help you determine the best projector and mount combo. Give us a call at 888-392-4814

