 Brian and Rob celebrating a successful Lifestyle Projector Showdown.
What Is A Lifestyle Projector?
A lifestyle projector is a new breed of home projectors that have quickly gained in popularity. These all-in-one projectors offer a 4K resolution image, robust built-in speakers, smart autofocus features and streaming capabilities all contained in a compact portable body. They're easy to move around and set up making them perfect for those who want to use a projector around their home and backyard and not just mounted in a darkened home theater room.
The ProjectorCentral & ProjectorScreen.com 2023 Lifestyle Projector Showdown
We’re no strangers to doing projector shootouts, comparing different models head to head against each other. Our shootout series on Youtube and on our website have been some of our most popular and requested content. Consumers want to know how specific projectors compare to each other to help determine which is best to fit their particular needs and we want to help.
While we played host and financier for the contest, every aspect was entirely managed by and run under the direction of Rob Sabin, Editor-in-Chief at Projector Central; from the selection of the projectors to be included, the judges, the content used and the judging criteria. ProjectorCentral was also responsible for the calibration of each all-in-one projector entered into the Showdown, which were performed by ISF Level 3 certified calibrator, Sammie Prescott Jr.
We had help from several sponsors in putting on this event who provided us with some equipment, such as Spectra Projection who provided us with all of their Gamut White Reference projector screens that were used and AV ProEdge & Murideo for lending us all of the test equipment and signal distribution gear.
There were no golden samples or juiced up, cherry picked units provided by manufacturers for the purpose of this competition, these were retail units entered in this contest. To be clear, none of the brands competing were sponsors of the event, allowed on site or able to exert any influence over the judges or competition.
All of this effort was poured into this contest to answer the question: What are the best lifestyle projectors in 2023?
Judges
For this in-depth competition to determine the world's best 4K lifestyle projectors, Projector Central brought together a panel of six expert judges, each of whom is well regarded in the projection, calibration and A/V industry in order to scrutinize and determine their picks for this year’s ultimate lifestyle shootout.
So, let's get to it and meet our esteemed judges:
John Higgins
Managing Editor, Tech, at Reviewed, part of the USA Today Network, ISF-trained display calibrator
Mark Henninger
Editor-in-Chief for Sound & Vision, former Managing Editor for Home Theater Review, former Editor-in-Chief for AVSForum.com, THX-trained display calibrator
How The Judges Picked The Best
In this round of the tournament, we put 5 different lifestyle projectors side-by-side so that they could be easily compared to each other and judged at the same exact time.
The goal of this contest was of course to enable the judges to choose the top lifestyle projectors available on the market. So Projector Central tested the contestants by simultaneously running them through a gauntlet of challenges to reveal their color accuracy and dynamic range with both SDR and HDR content, resolution/detail with still and motion video, image scaling/processing and contrast with both the lights on and the lights off.
Each all-in-one lifestyle projector was positioned across the room and shined onto 5 identical white, 100 inch, 1.0 gain Spectra Projection screens that would equally allow the projectors to show off their image quality.
The autofocus, object-avoidance and auto-keystone correction features were turned off on all of the projectors.
The projectors were evaluated side by side using a series of test patterns from the Murideo generators and movie/TV program clips from our Kaleidescape media player, Oppo UHD disc players and DirectTV box, that put each projector to the test.
All content was distributed to all projectors at the same time via hardware and connectivity provided by our sponsors at AV Pro Edge
Each of the lifestyle projectors in this showdown were calibrated in 3 modes; SDR Day (Bright Room), SDR Dark Room and HDR Dark Room with all calibrations performed by ISF level 3 certified calibrator, Sammie Prescott, JR.
Evaluations were held with both lights on and lights off to best simulate the viewing experience that you’d find in a living room setup.
Judges were given ballot sheets to rate each projector for specific attributes of picture quality, such as Color Accuracy, Contrast, Black Level/Shadow Detail, and Detail/Sharpness.
While there is a lot more that goes into selecting a lifestyle projector such as cost, operating system, auto-correction capabilities, input lag and more, these units were solely scored on the basis of picture quality.
The built in audio of each of these projectors was judged separately the following day by Rob Sabin, Editor-in-Chief of ProjectorCentral with a 2nd judge this year; Chris Boylan, Editor-in-Chief of BigPictureBigSound.com.
Rob, as former Editor-in-Chief of Sound and Vision is certainly no stranger to reviewing audio products so don't let his current role at a projector centric publication fool you into thinking otherwise.
Each projector was placed in the same location and reviewed one-by-one to ensure all of the room acoustics were the same for each evaluation. Each lifestyle projector was graded on the following criteria:
- Bass Performance
- Overall Volume / Dynamics
- Accuracy / Timbre
- Music Imaging
- Movie / TV Imaging
So, who will win this showdown and earn the title of the best lifestyle projector for 2023? Let’s find out!
Winner: Best Lifestyle Projector
The results are in and the winner of the 2023 Lifestyle Projector Showdown and the judges pick for the best lifestyle projector in our shootout is...
Projector Resolution: | 4K |
Brand: | Formovie |
Product Status: | In Stock |
Lumens: | 2450 |
Projector Type: | Lifestyle |
Light Source: | Laser |
Contrast Ratio: | 1200:1 (Full On/Off) |
Chipset: | DLP |
Aspect Ratio: | 16:9 [HD] |
Throw Ratio: | 1.27:1 |
Native Resolution: | 3840x2160 |
Lens Shift: | No |
Input Lag: | 4K/60Hz: 42.5ms |
Built-In Speaker: | Yes |
Warranty: | 3 Years |
Standard Lens Focus: | Motorized |
Digital Inputs: | HDMI |
The Formovie X5 was the dark-horse of this year's competition with it's FengOS operating system (comes bundled Firestick 4K Max for streaming services) and limited calibration controls. While it's Global Version with GoogleTV is not expected to hit the USA until early 2024, the X5 was still included at the discretion of ProjectorCentral due to it's high level of popularity and great reputation.
The X5 did not disappoint in that regard and tied for first place for the judges' pick for video and had the highest overall point total, including the highest score in both the SDR Dark & HDR Dark evaluation rounds, all while being the least expensive unit in the Showdown.
I am confident that when the Global edition starts shipping and the additional controls and features become native to this projector, it will become an even more attractive option and provide an even better experience.
SDR DARK REFERENCE MODE
Color Accuracy / Skin Tone
7.08
Black Level / Shadow Detail
8.50
Detail / Sharpness
7.58
24p Motion
8.20
SDR DAY MODE
Color Accuracy / Skin Tone
7.50
Detail / Sharpness
8
HDR DARK REFERENCE MODE
Color Accuracy / Skin Tone
7.58
Overall Contrast / Tone Mapping
7.67
Black Level / Shadow Detail
7.33
UHD Detail / Sharpness
7.67
WCG Content
7.67
Rainbows
Highly Distracting
Speckle
Mildly Distracting
Notable Features
Light Engine:
Single Laser
Gaming Lag Time (4K 60hz):
39 ms
Typical Street Price (USD):
Overall Volume / Dynamics:
4
Projector Resolution: | 4K |
Brand: | BenQ |
Product Status: | In Stock |
Lumens: | 3300 |
Projector Type: | Lifestyle |
Light Source: | LED |
Contrast Ratio: | 600,000:1 dynamic contrast ratio |
Chipset: | DLP |
Aspect Ratio: | 16:9 [HD] |
Throw Ratio: | 1.15:1 - 1.50:1 (D:W) |
Native Resolution: | 3840x2160 |
Input Lag: | 4K/60: 16.67ms|1080p/60: 16.7ms|1080p/120: 8.3ms|1080p/240: 4.2ms |
Built-In Speaker: | Yes |
Warranty: | 3 Years |
Standard Lens Focus: | Powered |
Operating System: | Android TV |
The BenQ X3100i is really billed as a "gaming projector" due to the extensive feature set it includes to excel for that particular application. Just because something is built for one purpose doesn't mean it doesn't perform well at others and the X3100i is a true testament to that.
While it didn't win in any particular area, the X3100i's designation as tied for #1 Judges' Pick shows that in its totality, it was greater than the sum of its parts.
It's high brightness, low lag & 3D support make this a versatile option for many applications.
SDR DARK REFERENCE MODE
Color Accuracy / Skin Tone
7.58
Contrast
6.83
Black Level / Shadow Detail
6.90
Detail / Sharpness
7.67
24p Motion
8.20
SDR DAY MODE
Color Accuracy / Skin Tone
8
Overall Contrast
6.75
HDR DARK REFERENCE MODE
Color Accuracy / Skin Tone
7.42
Overall Contrast / Tone Mapping
7
Black Level / Shadow Detail
6.67
UHD Detail / Sharpness
7.33
WCG Content
7.08
Rainbows
Mildly Distracting
Speckle
Not Distracting
Notable Features
Gaming Lag Time (4K 60hz):
16.7 ms
Typical Street Price (USD):
Overall Volume / Dynamics:
3
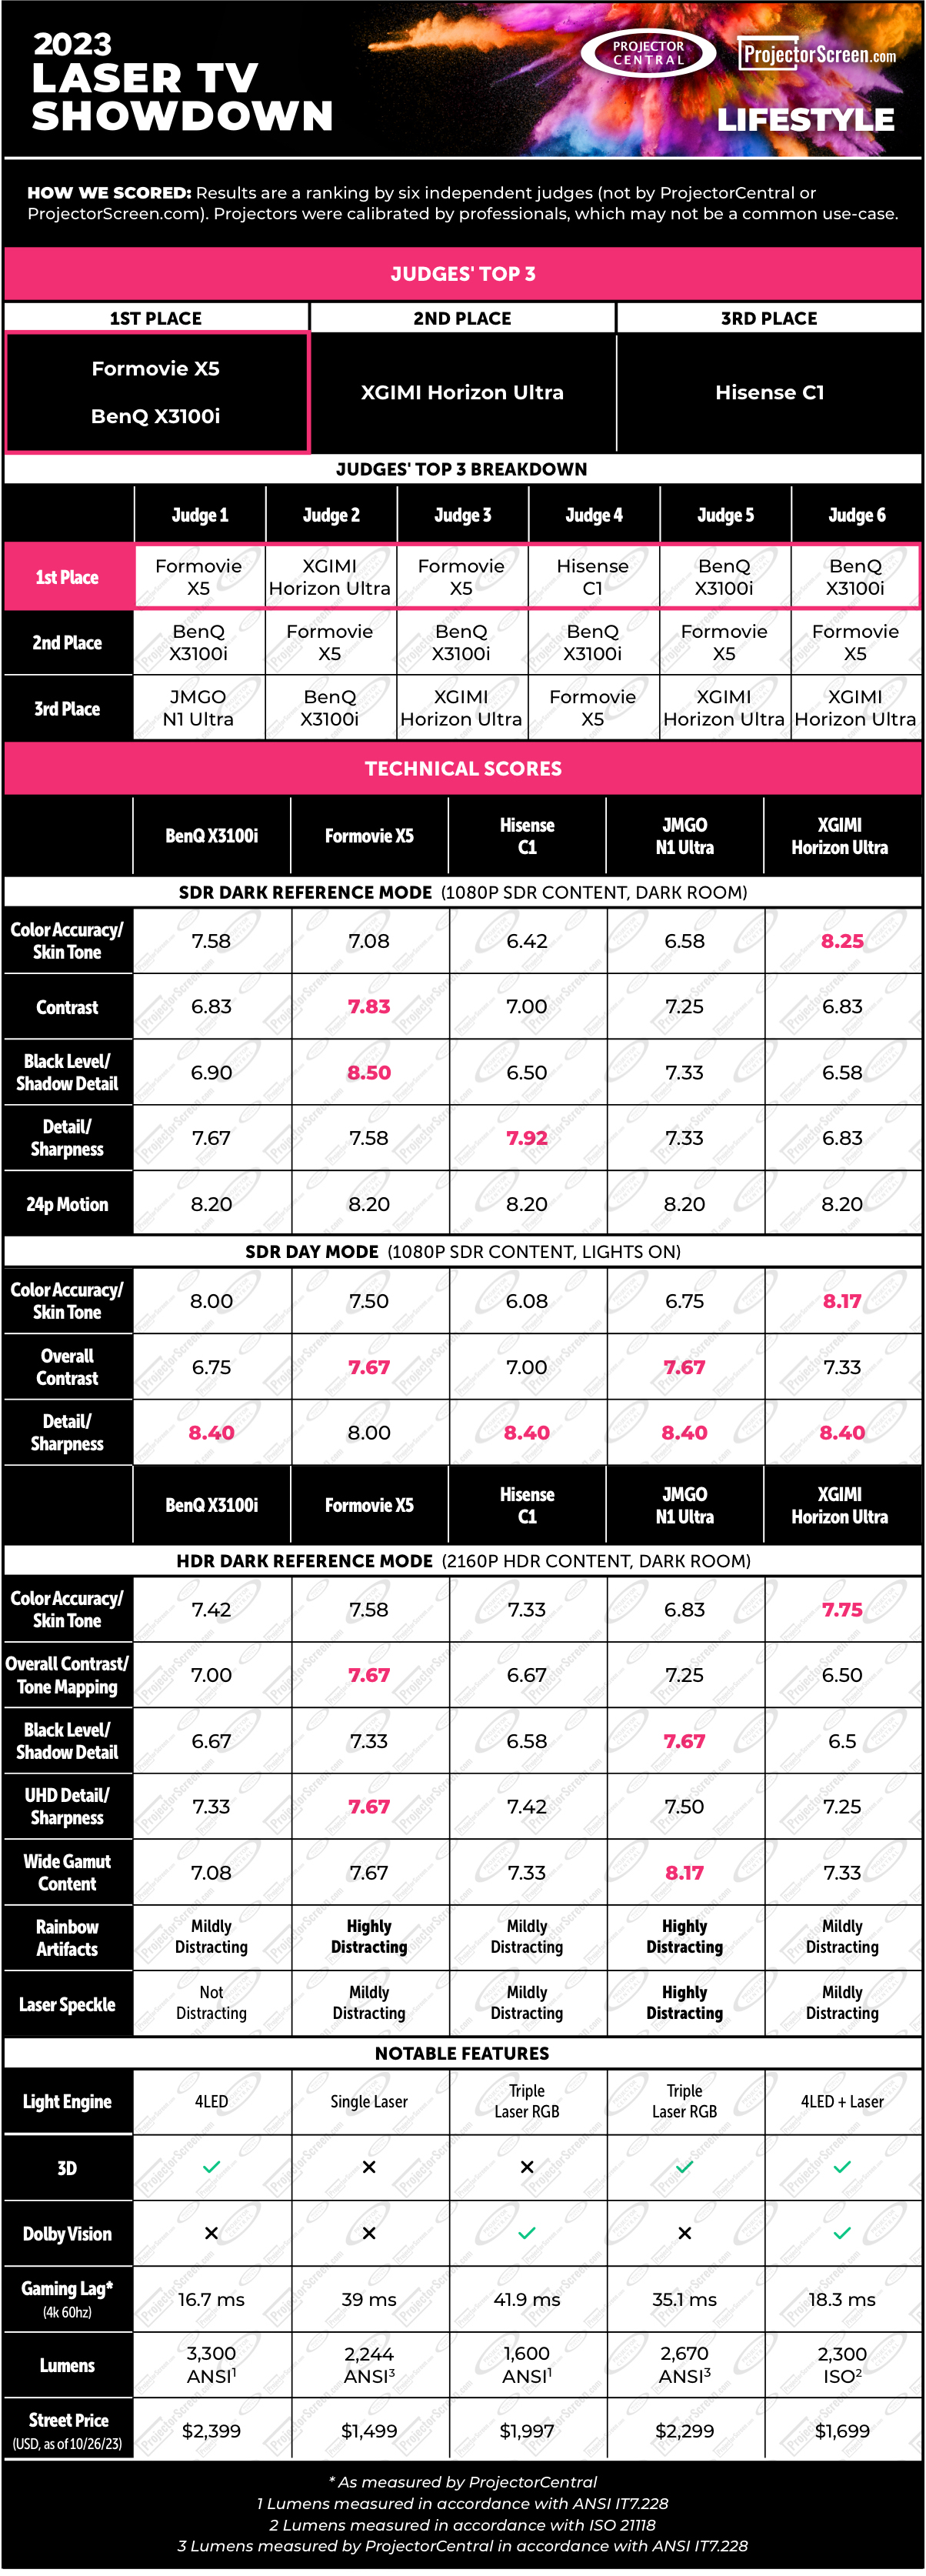
Here is how the judges scored each lifestyle projector:


Projector Resolution: | 4K |
Brand: | XGIMI |
Product Status: | In Stock |
Lumens: | 2300 |
Projector Type: | Lifestyle |
Light Source: | LED and Laser |
Contrast Ratio: | 700:1 (Full on/off) |
Chipset: | DLP |
Aspect Ratio: | 16:9 [HD] |
Throw Ratio: | 1.20:1 - 1.50:1 (D:W) |
Native Resolution: | 3840x2160 |
Input Lag: | 4K/60Hz: 18ms |
3D Support: | Full HD 3D |
Built-In Speaker: | Yes |
Warranty: | 1 Year |
Standard Lens Focus: | Automatic |
From looking at the scorecards, it is plainly obvious that the XGIMI Horizon Ultra really excelled with it's great color accuracy / skin tone, taking top marks for that in all 3 rounds of this competition, possibly due to it's unique 4LED+Laser Hybrid light engine that no other lifestyle projector possesses.
It is also the only lifestyle projector in this Showdown that supports both Dolby Vision and 3D.
It also has a low lag time and high brightness which makes it a great choice for gamers and its low price tag really sets it apart as an incredible value, especially when you consider it scored the highest marks in all of the audio judging criteria as well.
SDR DARK REFERENCE MODE
Color Accuracy / Skin Tone
8.25
Contrast
6.83
Black Level / Shadow Detail
6.58
Detail / Sharpness
6.83
24p Motion
8.20
SDR DAY MODE
Color Accuracy / Skin Tone
8.17
Overall Contrast
7.33
HDR DARK REFERENCE MODE
Color Accuracy / Skin Tone
7.75
Overall Contrast / Tone Mapping
6.50
Black Level / Shadow Detail
6.50
UHD Detail / Sharpness
7.25
WCG Content
7.33
Rainbows
Mildly Distracting
Speckle
Mildly Distracting
Notable Features
Light Engine:
4LED + Laser
Gaming Lag Time (4K 60hz):
18.3 ms
Typical Street Price (USD):
Overall Volume / Dynamics:
Projector Resolution: | 4K |
Brand: | Hisense |
Product Status: | In Stock |
Lumens: | 1600 |
Projector Type: | Lifestyle |
Light Source: | Laser |
Contrast Ratio: | 2,000,000:1 |
Chipset: | DLP |
Aspect Ratio: | 16:9 [HD] |
Throw Ratio: | 1.20:1 (D:W) |
Native Resolution: | 3840x2160 |
Lens Shift: | No |
Input Lag: | 4K/60Hz: 39.3ms |
3D Support: | No |
Built-In Speaker: | Yes |
Warranty: | 1 Year |
Standard Lens Focus: | Automatic |
ARC/eARC: | eARC |
Operating System: | VIDAA |
This was Hisense’s first front projector. You definitely wouldn’t believe it given the high quality picture it produces. The Hisense C1, while a projector I whole-heartedly recommend for those in a more controlled viewing environment, was not a favorite for the judges this year.
While it supports Dolby Vision and has high scores in sharpness and fantastic audio rankings, its highest input lag and lowest brightness were likely contributing factors to it only being selected as a top pick by one of the judges.
From a pure design perspective, I like the Hisense C1 Cube’s metal exterior and more premium aesthetic.
SDR DARK REFERENCE MODE
Color Accuracy / Skin Tone
6.42
Contrast
7
Black Level / Shadow Detail
6.50
24p Motion
8.20
SDR DAY MODE
Color Accuracy / Skin Tone
6.08
Overall Contrast
7
HDR DARK REFERENCE MODE
Color Accuracy / Skin Tone
7.33
Overall Contrast / Tone Mapping
6.67
Black Level / Shadow Detail
6.58
UHD Detail / Sharpness
7.42
WCG Content
7.33
Rainbows
Mildly Distracting
Speckle
Mildly Distracting
Notable Features
Light Engine:
Triple Laser RGB
Gaming Lag Time (4K 60hz):
41.9 ms
Typical Street Price (USD):
Overall Volume / Dynamics:
Projector Resolution: | 4K |
Brand: | JMGO |
Product Status: | Information Only |
Lumens: | 2200 |
Projector Type: | Lifestyle |
Light Source: | Laser |
Contrast Ratio: | 1,600:1 (full on/off) |
Chipset: | DLP |
Aspect Ratio: | 16:9 [HD] |
Throw Ratio: | 1.20:1 (D:W) |
Native Resolution: | 3840x2160 |
Lens Shift: | No |
Input Lag: | 4K/60Hz: 15ms |
3D Support: | Full HD 3D |
Built-In Speaker: | Yes |
Warranty: | 1 Year |
Standard Lens Focus: | Automatic |
ARC/eARC: | eARC |
Operating System: | Android TV |
While not picked by the judges for a top spot in this year's Showdown, the N1 Ultra is actually my personal go-to lifestyle projector for personal use when traveling.
It high scores in contrast, black level, shadow detail and wide color gamut produces an impressive image, especially when coupled with its high level of brightness and it supports 3D to boot!
One of its greatest features was not part of the image quality judging, but really sets it apart from any other projector in the competition; its integrated gimbal design.
JMGO paid tremendous attention to the design of this product and its gimbal by far gives it a huge edge over the other projectors from a versatility and placement perspective. It is very easy to place it on any surface, from the floor to a table to a shelf and easily pivot the lens to the desired projection surface.
They also have other great accessories including a ceiling mount and a floor stand which further make this such a versatile option.
SDR DARK REFERENCE MODE
Color Accuracy / Skin Tone
6.58
Contrast
7.25
Black Level / Shadow Detail
7.33
Detail / Sharpness
7.33
24p Motion
8.20
SDR DAY MODE
Color Accuracy / Skin Tone
6.75
HDR DARK REFERENCE MODE
Color Accuracy / Skin Tone
6.83
Overall Contrast / Tone Mapping
7.25
Black Level / Shadow Detail
7.67
UHD Detail / Sharpness
7.50
Rainbows
Highly Distracting
Speckle
Highly Distracting
Notable Features
Light Engine:
Triple Laser RGB
Gaming Lag Time (4K 60hz):
35.1 ms
Typical Street Price (USD):
Overall Volume / Dynamics:
3
I really want to give an extra big thank you to our sponsor Spectra Projection for providing us with 5 of their Gamut white projector screens to use for this competition, which ensured all projectors were using an identical & uniform 4K rated surface that was ideal for the type of competition we held.
Also a big thank you to AVPro Edge / Murideo who provided us with such an array of generators, analyzers, distribution and connectivity equipment to help ensure that all went well with our signals, EDID and HDMI connections.
Conclusion
While it was certainly more straightforward to set up 5 units compared to the 9 we set up for the UST projector shootout, this was still an all around trying effort to find the best lifestyle projector. Everyone involved, from our 6 expert judges to the event calibrator, to the maestro himself, Rob Sabin, did a tremendous job and a service to projection enthusiasts everywhere.
We can't stress enough what an amazing job Rob Sabin did and the amount of effort he put forth to successfully make this the definitive event of its type. Putting on both the laser TV and lifestyle projector showdown in one day was a tremendous challenge. I don’t think there is anyone else who could have brought this all together better than Rob.
It was great getting a chance to meet and hang out with these knowledgeable judges, both reconnecting with some that I became acquainted with last year and being able to make some new friends this year. What an absolutely interesting, affable and insightful group. I look forward to working and socializing with them at future events.
It was also really amazing to see how when reviewing a projector juxtaposed next to several others, it really can change your perception of a projector's performance and attributes as opposed to when you review and analyze it on its own. It really helps that we were able to directly compare each projector against so many other units at the same time.
Keep this page bookmarked and check back soon as we will be adding some additional content that we just didn't have time to squeeze in before publishing this as we wanted to share the results with you all as soon as possible.
Thanks for helping us award the winner of the best 2023 Lifestyle projector in this showdown, and as always, KEEP ON PROJECTING!
Need help picking the right lifestyle projector? Give us a call:
(888) 392-4814
