6 Things To Consider Before Hanging Your Projector Screen
There are a lot of articles out there about how to hang a projector screen. But, very few on what to consider BEFORE you hang it! That’s why ProjectorScreen.com
asked expert lifestyle tech and interior designer, @jannarobinson.com
to weigh in.
When I started my lifestyle tech and design firm, I was ill-prepared for how many clients would want an in-home theater (aka, media rooms). Overtime, this has morphed into the concept of a multipurpose room that includes a viewing area. Thus, my job to accommodate a seamless viewing experience within a busy space can be a challenge. The good news is that today's market has evolved alongside client needs.
All told, the demand for projector screens led me down a rabbit hole, which involved a lot of trial and error. But I was determined to understand how best to prepare before hanging one!

Fortunately, I was able to work with some of the best integrators in the business. As a result, I discovered that there is a lot more than meets the eye when hanging a projector screen. As well, I quickly learned that a poorly chosen and/or poorly installed screen can make or break the viewing experience.
An improperly hung screen can affect color, contrast, image quality, not to mention, brightness.
What are the top five things to consider before you hang your projector screen?
In the following article, I will discuss the five things I believe are most important to consider before hanging your projector screen. Whether you’re designing a home theater or revamping your living room viewing experience. My goal is to ready you with confidence for this task!
What comes first, the size of the projector, the placement of the screen or the seating arrangement?
Placement And Size

As a designer, the first thing I do is establish where the screen will live. Then I work backwards. Of primary importance, is assuring I’ve factored in the throw ratio. (The throw ratio is the distance between the projector and the screen in relation to the width of the image being projected.) Determining where to house the screen can only be done once I’ve done this.
#1 of the five things to consider before you hang your projector screen: Does Seating dictate screen placement or vice versa?
In an empty space, you'll need to identify a blank wall. However, if your screen is motorized from the ceiling, then you need to determine the most comprehensive placement. That means hanging the screen in a way that allows for both optimal viewing and traffic flow.
I had a client who was very proud to present his drop-down screen. While it accommodated the seating arrangement in the space, it cut the footpath to the staircase. Thus, when someone was done viewing, but others were still watching, that person had to duck down as he made his way upstairs to avoid blocking or hitting the screen. Not great screen placement!
The intention of a motorized screen is to maximize use of the room. It's important to remember that while the screen will disappear after use, when it's down, it takes up space.

Options for screen size and placement can be limited. More times than not, it’s fairly obvious where that screen will live. Thus, I build the seating in response to this initial decision.
Conversely, many rooms have structural issues that don't allow for multiple seating designs. As a result, I need to figure out a way to house the screen in harmony with the seating. Things get tricky when the two are not easily rectified. An interior designer is ideal in these moments, saving both headache and dollars in finding creative resolutions.
Establish where your screen will live
Once I commit to where the screen lives, I map out a visual guideline between the seating area to the focal point at the center and mid-range of the screen. Screen placement should allow for optimal viewing from all angles and distances. Find this sweet spot. It's key! This midline is your reference point to build seating out and around.
Why not choose the projector first?
I start with screen placement because that’s the least adjustable element of the two.
As mentioned above, size and placement of screen factors into the throw ratio. This then determines which type of projector will satisfy the placement requirements. If you’re installing a projector, account for its height and confirm there’s enough space. You also want to assure a positive offset. If you’re mounting your projector, identify the best location and positioning. As well, make sure your ceiling allows for this install, and don’t forget to work out the projector's throw distance.
Type of Screen

#2 of the five things to consider before you hang your projector screen: Determining the Best Type of Screen for You
There are many excellent projectors on the market. You can find everything from rear projection screens to whiteboard projector screens to acoustically transparent screens. Not to mention, the quality of the screen is obviously an important component in your decision making. That said, the type of screen you want will depend on whether your space calls for a fixed, motorized, or portable.
Fixed Screen
A fixed projector screen is designed for permanent mounting. Because a fixed screen lives on the wall, it’s always in view. However, you can project images or artwork onto it as an aesthetic choice. Bonus; this offers an opportunity for a "wow factor."
Overall, a wall mounted screen is a great option for anyone who wants to create a permanent viewing area.
Motorized Screen
A motorized projector screen is equipped with an electric motor. This enables the screen to raise and lower automatically. It easily retracts or deploys with an app or remote control.
Motorized screens come in a variety of sizes and materials. They're available in both floor-rising and ceiling-mounted configurations.
The ceiling mount or mounted motorized screen is excellent for smaller rooms that don’t allow for wall space. As well, I often install them in bedrooms as many clients want to obscure the screen when not using it.
Overall, a motorized projector screen is a great option for anyone who values convenience and flexibility. Additionally, this option creates a seamless transition from the presence of a screen to its absence.
Portable Screens
As you might infer from its name, a portable projector screen is easy to transport. Unlike static or motorized screens, portable screens are lightweight and typically fold or roll up for easy storage and transport.
These screens are available in both front and rear projection configurations. They're great for outdoor movie nights, business presentations, and impromptu events.
Additionally, most portable screens are quick and easy to set up. Thus, not an ordeal to improvise a transformation of your space into a viewing opportunity.
Overall, a portable projector screen is a great option for anyone who needs a screen that's easy to transport and set up in different locations.
Lighting
#3 of the five things to consider before you hang your projector screen: What do you need to know about Lighting and hanging projector screens?
Many facets go into creating the ideal media room or home theater. A primary one, which is often overlooked, is lighting. Lighting plays a crucial role in your viewing experience. One wants to be immersed in one’s entertainment and not distracted by easily avoidable lighting mistakes.
The number one factor to consider in your room is light reflection on the screen. The objective is to avoid having direct light spillage onto the area of the screen. Perfecting your lighting is paramount as a pitch black room as this can cause eye strain, headaches, and in some cases motion sickness. It's true! While too much light will negatively impact the quality of projection. In essence, you can think of it as wanting enough light to see your phone or tablet, yet not too much that it competes with the picture.
*Before mounting your screen, consider the contribution the lighting will make to the room's overall feel. Familiarize yourself with different types of lighting to determine what will function best in your room.
What if your room has windows and doors?
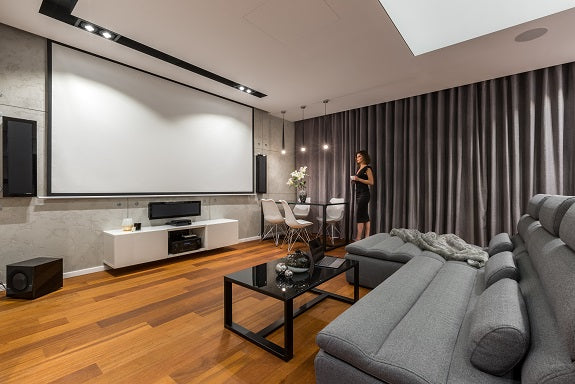
If your room has windows or doors, the first thing you need to think about is blocking out the light. I recommend blackout curtains or shades. This has actually become a burgeoning market with many aesthetically pleasing colors and patterns now available. If you're using shades, put them on a fixed vertical offset or track system. This prevents light spillage from the sides.
When it comes to the wall color or treatment, the darker your walls, the less light reflection you'll have. I'd recommend darker shades of blues, grays, browns, taupes, or even dare I say, black.
Should you be using paint, opt for a flat or matte finish. Paint the ceiling a shade or 1/2 shade lighter than your chosen paint color or treatment. Assure you use a finish that doesn't reflect light. You also want to be mindful of anything around or underneath the screen that can reflect light. Some people opt to upholster the walls with acoustically treated fabrics that help balance the sound in the room.
Ambient Light Rejecting Projector Screens
Of course the best thing you can do if you want to use your projector with the lights on is to use an ambient light rejecting projector screen.
Ambient light rejecting projector screens, also known as ALR screens, are innovative screens designed to improve the image quality and performance of projectors in environments with high ambient light.
These cinema screens feature unique optical coatings or materials that are specifically designed to absorb or reflect ambient light, thereby enhancing perceived contrast, color accuracy, and image clarity. ALR screens are ideal for settings where controlling ambient light can be challenging. They allow users to enjoy bright and vibrant images with minimal loss of detail even in well-lit environments, providing an immersive viewing experience without the need for darkening the room.
What you need to know about lighting options
Recessed Lighting or Overhead lighting:
Generally, your overhead lighting is your main source of lighting with dimmable bulbs. Often these lights are recessed or flush with the ceiling and don't protrude. Projector images are susceptible to being washed out by overhead lights. Therefore, having the lights on dimmers is paramount.
Wall Sconces:
Wall sconces illuminate the wall on which they're mounted. Bear in mind, you want the light to shine up or down, but not outwards. This is designed to compliment, not to light the entire room. Sconces are ideal to leave on at a low level while watching content and usually won’t wash out the image.
Bias Lighting:
Bias lighting is designed to go from screen center and behind the screen to help reduce eye strain. This is helpful for the avid gamer or movie watcher.
Accent Lighting:
Accent lighting keeps the light from shining directly on the screen. Look around the room to see if there are any crevices or nooks to stash some accent lighting.
If a designated media room and budget allows, integrating lighting into architectural features can add value. For example, columns, coves, or strategically placed strip lighting adds a sense of flair to the viewing experience. You might even consider fiber optics with a starry night ceiling that provides indirect and subtle illumination to a room.
Regardless of your choice, make sure it doesn’t hang too low and obstruct the projector's line of sight.
Speaker Placement

#4 of the five things to consider before you hang your projector screen: Your speaker placement can affect your screen placement and type of screen.
As a part of any surround sound system you have a center channel plus a front right and a left channel speakers which are responsible for delivering the majority of the dialogue, music and sound effects in a movie or other media.
However, the size and placement of the projector screen can impact the sound quality of the front channels. If the screen is positioned too close to the front speakers, it can create reflections and distortions that can affect the clarity and accuracy of the sound. A very large size screen can also cover the ideal placement of the left and right speakers.
Before worrying that you won't be able to get the size screen you want or that you won't be able to have the ideal placement for your speakers, there is a solution. Acoustically transparent projector screens.
"What is an acoustically transparent projector screen?" you may ask yourself. Well, acoustic cinema screens allow soundwaves from a speaker to pass through the screen without interference. The perforations and fine mesh patterns allow for the optimal audio AND visual experience. There are two types of acoustic projector screens, perforated and woven. Each as their own advantage and disadvantage.
Mounting
#5 of the five things to consider before you hang your projector screen: What you need to know about mounting a projector screen
You've determined the best placement for your screen. You know where you want to place your projector. You've figured out the throw ratio and decided on which projector you want. Now what?
It's time to mount!
Firstly, the key to mounting is in choosing the right mounting hardware for your screen. Secondly, ensure that the wall or ceiling where the screen will be mounted is sturdy enough to hold the weight; you want to avoid damage to the drywall or the ceiling plate. Once you've located the best wall for the job, it’s time to investigate the different mounts on the market.
Recessed mounts in the ceiling or on-wall retract offer elegance to a dedicated theater room. Current trends emphasize multifunctional spaces with purpose and a recessed mount accommodates this. While recessed floor mounts are popular, ceiling mounts seem to be the preferred item though both allow the screen to be concealed when not in use; a designer’s dream!
Motorized or Manual Retractable:
If working with a motorized unit, it's best to collaborate with an AV integrator and/or designer. These experts help you discern the best product, placement and functionality.
The motorized screen is programmed to raise and lower with the swipe of a finger or voice control. It can also sync with the projector's on/off commands. If doing this yourself, make sure you have accessible power and Wi-Fi in the area where it will reside.
Overall, this is an evergreen space where technological advancements are coming to the forefront every year. New innovations are perfecting the viewing experience.
Viewing Angle
#6 of the five things to consider before you hang your projector screen: Don't forget the all important Viewing Angle
Accessible viewing angles from every seating option used to be an ordeal. However, given the way contemporary screens are constructed, there really isn't a bad seat in the house; the technology has improved significantly over the years. Now, you can view most of these screens from the side, and your viewing angle won't be compromised.
And that, my friends, completes my list of the five things to consider before hanging your projector screen! Soon enough, it will be time to get the popcorn and enjoy the show!


