Great native contrast measured at 19,3211:1 (Out of Box, Reference Mode, 1M away, facing lens)
~85-95% DCI-P3 Color Gamut Coverage with no color filter needed (depending on mode used)
All new 3,840 x 2,160 UHD 4K native resolution using three discrete 0.61” SXRD Imaging Chips, one each dedicated to Red, Green and Blue
Blue laser phosphor light engine with 20,000 hours of laser power until half life
Peak output of 2000 lumens
X1 Ultimate for Projectors Image Processor
HDR Support (HDR10 & HLG)
Reality Creation Image Enhancement
20% smaller and 30% lighter chassis than prior model line
Low input lag for gamers (21ms at 4K 60p, 13ms at 2K 120p)
New ACF (Advanced Crisp Focused), floating focus Lens
CONS
Manual Lens shift, focus and zoom
No lens memory functions for those with scope screens
Not designed for larger screens with only 2,000 peak lumens
No native 3D Support included, but can buy a transmitter for those enthusiasts with a 3D Disc collection
Higher cost when compared to other competition such as Epson’s LS12000
Noisy fan makes whirring sound as speed ramps up (this may be my sample and may not be indicative of normal XW5000ES’s)
Highlights
The Sony VPL-VW5000ES was created as a more budget friendly projector for the home theater arena. Some key features include:
True UHDA (Ultra High Definition Alliance) resolution of 3840 x 2160
A Blue Laser Phosphor Light Source providing up to 20,000 hours of near maintenance-free operation with a more consistent brightness over time as compared to lamp based systems.
Features 2,000 lumens of brightness delivering great images, even in rooms with ambient light.
Supports HDR10 and HLG (Hybrid Log-Gamma) HDR Formats.
Wide color gamut support with their TRILUMINOS Display panels for more rich and accurate colors on screen.
Features Motionflow Technology to reduce motion blur for a more smooth, fluid motion on screen, without the Soap Opera Effect when used sparingly.
Dynamic Range Enhancement for improved contrast and detail in darker, low APL scenes.
Reality Creation processing with the X1 Ultimate for Projectors chip which scales lower resolution content to almost 4K quality while providing enhanced depth, clarity and detail.
Flexible installation for up to 85% vertical and 31% horizontal lens shift using the manual knobs on top of the chassis.
Low fan noise so as to not disrupt your movie watching experience.
Smaller and lighter compact design as compared to previous models, which makes for easier installation and mounting.
Compatibility with the latest equipment with HDCP 2.3 Content Protection over HDMI.
Reduced Input Lag for better, more reactive and precise competitive gaming.
Includes two HDMI Input ports and one USB for device connectivity.
As you can see, the Sony VPL-XW5000ES SXRD projector has many advanced, high-performance features which make it a great choice for the budget conscious home theater aficionado who doesn’t want to spend their kid’s college savings but wants top tier performance where it counts on screen.
Aesthetics
Available in both black and white, the Sony VPL-XW5000ES maintains Sony’s sleek, modern chassis design. It blends in well in your living room with the white chassis, or most dedicated home theaters if you choose the black one. It has a nice Matte Finish, and as stated is available in a black or white chassis. Either choice offers a nice, sophisticated appearance which will complement your choice of rooms and environments nicely. The edges are rounded and smooth, giving it a less boxy appearance.
It has a very streamlined, angled top and shape, with the white reminding me and others of an Imperial Star Destroyer from the Star Wars Movies. All that is missing is the Control Tower Cockpit on the top rear, haha! It has a more compact size when compared to some of its main competition, making it more elegant and less intrusive on your room design and aesthetics. There are ventilation slats on almost the entire front with small ones on the sides which not only function to cool the chassis and its internals, but give it a nice, professional look to it.
The lens assembly protrudes from the front, center of the chassis: This gives it a pleasing and evenly balanced, symmetrical look to it. There is a control panel located on the side featuring minimal controls that can be used in case the remote is not close by or is unfortunately lost. On The same side towards the rear are the two HDMI and other Input ports used for your external video sources and USB connections.
Last but not least, on the front there are integrated status indicators that are discreetly placed into the fins of the cooling vents. They’re not too bright, ensuring they do not distract when the projector is in use.
Overall, I like the minimalist design of the Sony VPL-XW5000ES. It is functional, elegant and simple, but it does come across as somewhat less luxurious with its plastic housing when compared to its competition like the Epson LS12000 and especially the JVC NP5 or NZ7.
Projector Calculator
Our projector calculator is used to determine throw distance and optimal screen sized based on your projector.
Installation/Lens Info
Lens Type
Manual H/V Shift, Zoom & Focus
1.6x Manual Zoom
54mm Polymer and Glass Floating Lens System
Throw Ratio Range
1.38 – 2.21:1
Lens Shift, Powered
Vertical: +/-80% (from H center)
Horizontal: +/-34% (from V center)
Lens Shift Range: +85/-80% Vertical and +/-33% Horizontal
Keystone Adjustment
N/A
Laser Light Source
The Sony VPL-XW5000ES projector utilizes a blue laser phosphor light source, as many other models do nowadays. It provides numerous advantages versus the old, traditional lamp equipped projectors. With laser light source projectors, they have much longer lifespan and this one is rated up to 20,000 hours until half life. This reduces the need for more frequent lamp replacements and general projector maintenance compared to laser based systems..
The VPL-XW5000ES projector provides a brightness of up to 2,000 lumens which can result in more vibrant colors and easier to see images, even in rooms with ambient light. This laser light source is more stable and maintains its brightness level much better over its lifespan. With traditional lamp based designs, they will go dim faster over time, resulting in more frequent lamp replacements to maintain brightness constancy.
When using a laser based projection system such as this Sony, a big advantage is that the projector will power on and off almost instantly. It doesn’t need a long warm up or cool down period that you see with lamp projectors.
Laser technology such as that employed by Sony and other brands is energy efficient for the same light output vs a lamp based projector. This results in lower power being consumed and making it more green and environmentally friendly. This is a big reason that Europe has banned the sale of lamp based projectors, effective within the next couple years as I recall. This also helps manage the internal heat more efficiently which in turn improves long term reliability and the lifespan of the internal electronic components.
Brightness
The Sony VPL-XW5000ES projector’s 2,000 lumens, up from 1500 lumens in the prior VPL-VW325ES model, can result in outstanding brightness on screen when used in a dedicated home theater room or even moderately well lit environments. This high of a brightness level is very beneficial when displaying various HDR (High Dynamic Range) sources and content. It can enhance perceived contrast and shadow detail in both low APL (average Picture Level) scenes along with delivering great punch and colorful details in the bright scenes.
I tested the Sony VPL-XW5000ES, as I did with the JVC NZ800, on a white 0.8 gain Seymour AT screen in my darkened and dedicated home theater environment. As seen with the JVC, this Sony with the lights off in my dark environment, the projected image provided a sharp, dynamic, clear end result on screen. It is definitely a nice upgrade from Sony’s prior model, the aforementioned VW325ES. There has been talk of Sony’s prior models having issues with their SXRD panels degrading and losing contrast and turning a hazy blue tint, especially in dark/black scenes. This appears to be a thing of the past based on all reports of their newer panels, which started in their vaunted GTZ380 10,000 lumen beast!
This added brightness of 500 more lumens also really helps HDR content because the black floor remains relatively stable compared to prior generations and the brightest parts of the image increase. This should raise the overall dynamic range of the HDR content being viewed.
Another advantage of the added brightness is maintaining the color gamut coverage while also increasing the color brightness so the colors will appear more vibrant and can trick your eye into believing the saturation and gamut coverage is higher than it actually is.
A big benefit that helps overall brightness is the fact that Sony doesn’t require a color filter to get nearly 90% coverage of the DCI-P3 color gamut like the JVCs still employ. These filters rob a lot of light, as in the case of the JVC NZ800 I recently did, which lost about 32% of its light with the filter in place. Granted, with this filter they can get near 100% of the DCI-P3 gamut. So it is a good choice to have, but Sony decided not to have this option to save costs and keep this entry level product as affordable as possible.
A standard white screen is your best choice if you plan to install the VPL-XW5000ES in a dedicated, light controlled environment. There is no need for an ALR or gray screen in this scenario like you may want to use with low contrast, single chip DLP or LCD projectors, unless you have room lighting that may affect the image or if you want to try to lower the black floor with a gray screen. Just be advised that with this option you will also lower the peak white levels by the same amount.
SDR Uncalibrated
Image Mode
Lumens
Cinema Film 1
1,518
Cinema Film 2
1,688
Reference
1,813
TV
1,348
Photo
1,653
Game
1,801
Bright Cinema
1,654
Bright TV
1,427
User
1,823
IMAX Enhanced
1,540
SDR Calibrated (Laser Level 50)
Image Mode
Lumens
IMAX Enhanced
1,518
Colors
SDR Mode Measurements, Pre-Calibration (Out of the Box)
Cinema Film 1
Cinema Film 2
Reference
TV
Photo
Game
Bright Cinema
Bright TV
User
IMAX Enhanced
SDR IMAX Enhanced Mode, Post-Calibration
Post Calibration Capture
SDR Rec709 Color Checker
SDR Rec709 Saturation Sweeps
HDR Mode Measurements, Pre-Calibration (Out of the Box)
One of the strengths of the Sony VPL-XW5000ES projector is in its color rendition, delivering incredibly realistic images. Sony’s blue laser phosphor light source with their Triluminos Pro results in a wide color gamut on screen, close to 95% of the DCI-P3 Color Space, giving the projector the ability to produce saturated, accurate colors which are needed for today’s latest 4K HDR video sources such as the latest Hollywood Blockbusters and sports action alike!
Triluminous Pro expands the color gamut, which allows the XW5000ES to produce a wider gamut of colors. It makes the colors appear closer to what is seen in real life, for a more realistic experience in your home theater or media room. The processing it uses features 10-bit precision to show over one billion colors on screen, which is said to reduce color gradients between shades of colors and the transitions between them. When done improperly, this can cause what is known as banding between these gradients. Unfortunately Sony has had some issues with banding in recent models. This model line seems better, but there is still some banding in certain scenarios, so it is something they should continue to work on and improve in future models, which according to rumors should be announced soon. I am sure if this rumor is true, it should be around the CEDIA timeframe which is early September, which very well could be announced and reported before this review is even published.
The VPL-XW5000ES also thankfully includes some advanced calibration tools for color, known as a CMS, or Color Management System. This allows end users and calibrators to adjust various color properties such as the balance of the three colors on screen, saturation, color brightness and hue to either industry specifications or their own personal preferences. This can be done and saved to attain a calibrated or particular look for varying types of video content or formats.
Sony has a feature in their recent models known as Enhanced HDR: This feature is available for HDR10 and HLG input formats. They say it makes the incoming colors appear to be more vibrant and dynamic. With Enhanced HDR enabled, they report brighter whites, deeper blacks, with an expanded color depth to give the viewer more dynamic and realistic images. I say, upon testing, to use this feature sparingly on most good HDR content, but more so with not so good, low nit HDR sources. Unfortunately “good HDR content” isn’t always the norm, so turning this feature on certainly helped the perceived image on screen to appear more dynamic and “HDR-Like” than some low nit, flat almost SDR titles would if shown in their native state. It helped the darks appear darker, without black crush that I saw, and also seemed to give the specular highlights a bit more pop. This is probably one part of Sony’s processing that I like which helps give their SXRD projector lineup a more DLP-like feel and look to them. This feature is the one to have on if you want to engage their tone mapping algorithms, said to be frame-by-frame, which they very well may be, but the level of tone mapping they chose to use more follows the strict PQ curve, including some of the clipping of highlights if called for, unlike solutions which are built in as on the JVC DiLA projectors, or ultra expensive external video processor solutions like the Lumagen Radiance Pro or madVR Envy line. Lucky for us budget restricted home theater aficionados, madVR has just announced a new, lower cost Envy known as the Core, for about half the cost of the next model in the lineup, the Envy Pro, and ? the cost of the top model the Envy Extreme Mk2. Hopefully Lumagen follows suit, or they will end up being left behind.
The XW5000ES has many customizable picture modes as listed earlier in our pre-calibration section. Every mode was designed for varying types of content, coming from the factory supposedly tuned for the best color and video performance for that particular content type. Thankfully, all of these Sony Picture Modes are able to be calibrated and saved separately and individually so you can have separate calibrations saved for different source inputs and content such as video games, Episodic TV or your favorite movies on disc or streaming. For most SDR sources, the mode I chose and that is the closest to ISF specs is the Reference Mode. This allows for the least amount of work and adjustments to get the best color accuracy from the XW5000ES.
Sony is known for great color rendition and the VPL-XW5000ES is no exception. Its color reproduction capabilities work very well with a wide range of viewing scenarios, from watching your favorite movies or sports to playing the latest video games. Sony is still providing a great visual experience after all this time in your home, be it in a dedicated theater, your living room or a fun media and gaming room.
The only next logical step Sony can take to move closer to home theater bliss for on screen colors would be to incorporate at least a dual laser design as they do in their much higher end projector, the incredible GTZ380, but preferably something even further along to get you to full BT2020 color gamut by using an RGB laser light engine. These have been used in very cheap UST and LifeStyle type projectors now for years, so it is far past time for these high end companies to incorporate this design into their so called top mid-tier lineup of home theater centric projectors. I know I say this a lot now in my reviews, but after experiencing these light engines in many USTs and LifeStyle projectors it is hard to go back to below DCI-P3 color gamuts, I must say.
Contrast
The Sony VPL-XW5000ES outputs a decent amount of peak light, which combined with its complementary decent black floor, offers one of the best projectors for contrast outside of the contrast kings known as JVC in the projection realm. The laser power is adjustable in steps from 0 - 100. This isn’t linear though, as zero does not equate to being completely shut off. These steps work out to zero being 5,077 cdm2 (nits) and 100 being 7,334 cdm2 (nits) when measured facing the lens from a meter away with the diffuser on the great SpectraCal HDR2000 C6 color meter. The same results will be achieved whether in SDR or HDR modes. Even when set to zero, if you have a good light controlled room, you can get great brightness on screen. Why would you do this, you ask? Well, when you lower the light engine’s output, be it a lamp or laser, you generally get better contrast overall as the black level decreases and so does the peak light output to the same extent, but what you gain is less light scatter and reflections within the optical path. This can result in a higher native contrast when measured, but with a dimmer overall image. This ends up being a personal choice. There is a fine balance between brightness and contrast where projectors are concerned. You just have to find your sweet spot and nobody else’s.
Measurements were done using CalMAN calibration software with a SpectraCal C6 HDR2000 colorimeter and a SpectraCal VideoForge Pro test pattern generator, taken 1 meter from the lens using the Diffuser on the color meter.
Contrast Measurements
Native On/Off • 18,113:1
ANSI Checkerboard • 344:1
There is a dynamic contrast enhancement feature on the XW5000. It is called HDR Enhancer and is accessed using the Contrast Enhancer button on the remote. These menu settings work for HDR of course, but do with SDR content as well, so we aren’t sure why they went with the HDR Enhancer nomenclature in this instance? Changing settings (OFF/LOW/MIDDLE/HIGH) from OFF to one of the other settings boosted blacks in the brighter images while providing a more dynamic image overall. On darker material, it seemed to crush some of the black details while having a similar outcome on the brighter areas within the dark scene, which gave it more depth and dimensionality overall in those dark scenes. My thoughts are to use this sparingly, as you should all these “special features” usually given to consumer displays and projectors. Maybe go with using LOW or MIDDLE so as to not affect the blacks too much if at all, while giving your image on screen a better dynamic visual.
ANSI Contrast Patterns used:
Sharpness, Detail, Clarity
The Sony VPL-XW5000ES projector has a 54mm lens installed. It’s a glass lens of good to great quality for this 4K entry level offering. The lens is designed to render a sharp, clear and detailed image, which it does, but it can be better and has been on similar prior models from Sony. The final stage of Sony’s ACF (Advanced Crisp Focus) lenses are a spherical polymer which they say is much easier and cheaper to produce to get the quality they desire. If they used an all glass exit element the cost of the projector would have gone up exponentially and they wanted to keep this model under $5,000. At the time of release it was the cheapest native 4K home theater centric projector.
I am not sure if it is this polymer element where the image exits for its final journey to your screen that is the fault, but the image isn’t quite as sharp as I think it should be when compared to the XW7000ES that I owned for a few months. Granted that is a larger lens, but this one is made from the same materials and uses the same SXRD panels. It appears that what Sony does is they use their Reality Creation and a feature called Digital Focus Optimizer (DFO) processing to over sharpen and compensate for the lens quality in the XW5000, which they don’t have to do on the higher up models, the XW6000 and 7000. You can see this effect when you toggle RC on and off. Unfortunately you can’t turn off the DFO feature, so it is undefeatable so the effects of this “feature” remain no matter what, to the overall image’s detriment.
The image takes on a digital, processed appearance, which at first looks very sharp and detailed to your eye and can fool you into thinking it is crisp and sharp, taking on a DLP like image, but over time when you and your eyes adjust, you start to see the hard digitization of it, looking almost like each pixel is over processed and compressed. It isn’t “bad” mind you, it just seems a little unnatural and harsh in comparison to the same base technology and components that are in the more expensive Sonys.
All that said, considering the price this projector launched at, $5,995 MSRP, I do think they could’ve gotten the optical sharpness and detail much better, especially considering they already saved costs by using a manual lens shift, zoom and focus mechanism instead of an electronic one, which should now be standard in a $5K+ model in 2024.
After initial setup, I checked and did a panel alignment but it didn’t need much adjustment.
Motion handling
As most if not all projector lovers know, Sony is reputed to have great motion reproduction on screen, and the newest 4K entry level model, the XW5000ES continues this tradition. Almost everything I watched on the XW5000 was movies on my new Kaleidescape Strato V or an Apple TV 4K while streaming with iTunes or viewing ripped UHD content with the Infuse app. I always turn off any special “features” on these projectors because they almost always do more harm than good, except things like dynamic tone mapping on the JVCs unless you have an external processor such as a madVR Envy or Lumagen Radiance Pro. That said, I put the XW5000ES’s Motionflow setting OFF in the menu. When I did try the True Cinema Motionflow mode, it reproduced the content well and didn’t introduce much, if any, soap opera effect. It is said to produce video in its original frame rate, be it 60 or 24 fps. This mode did keep the motion smooth and clear without a lot of judder. For sports lovers watching their favorite games I suggest using the mode called Smooth Low, which does a good job of smoothing out the horizontal motion. When turning Motionflow off, both frame interpolation and light modulation are disabled.
Chipset/Imaging Panel Technology
The entry level XW5000ES uses three newly sized 0.61” UHD 4K SXRD (Silicon Crystal Reflective Device), which is their version of LCoS (Liquid Crystal on Silicon) imaging panels, one panel each for the primary colors of Red, Green and Blue. Each panel has a 3840 x 2160 UHDA pixel resolution. The prior Sony SXRD Projector models utilized the DCI 4K format of 4096 x 2160, just as competitor JVC still does, but this time around they have decided to change the resolution to match the UHD standard that most all home devices and video source files have used since their inception.
One thing to note is that these new panels are now in the 16:9 UHDA format, and no longer in the DCI standard 17:9 Aspect Ratio. So if you are using an anamorphic lens setup, you may need a new one in a 1.33:1 stretch factor instead of the one you may have been previously using at 1.25:1, such as the Panamorph Paladin DCR. Now you will need something similar to the standard Paladin lens to get the correct aspect ratio and geometry on screen.
Video gaming
As I have said many times now, I’m not into gaming, at all. Although this may be true, I am happy to see that Sony has now built in support for 1080p 120Hz gaming mode. I am sure that makes many gamers and Sony fanboys happy! This is said to really help with lag and make the game appear to have very smooth motion and puts it more into the realm of more gaming centric projectors and even closer to flat panel performance. The input lag has been reported to be about 12ms in 1080p120 and around 20ms in 4K60.
I really do wish I could get into gaming. It would be incredible to play these games on such a giant screen, especially now with such high resolution coupled with great lag times and motion. I hear and read that it just keeps getting better and better. Maybe I will make a concerted effort to invite my son into the theater with his XBox X to teach me some of his awesome looking games!
Built in sound
As with all high end home theater projectors, this Sony doesn’t feature built-in sound or speakers, so you’ll have to pair this with a home theater surround sound system or a sound bar.
Remote
As you can see, the remote that is included with the Sony VPL-XW5000ES is virtually identical to the one used in previous generations of Sony projectors. It provides comprehensive control of the various features and settings provided to the user. It has a classic, ergonomic design featuring a comfortable hold and is quite user friendly and easy to operate. It has a good layout that is intuitive with all the buttons nicely positioned for easy reach and access for pressing. It has backlit buttons to ensure that the user can find the controls without needing ambient room lighting in a room like a darkened home theater. To me this is a must have for any high end projector or any other theater centric piece of equipment if you ask me.
The remote has all the buttons to control all of the essential functions of the projector, including such functions as power, input selection, menu navigation, volume, and picture adjustments. There are quick access buttons available to access the most frequently used features and menus and to quickly switch between the different picture modes to choose which viewing settings to activate for the various types of content being presented.
The remote allows you to easily navigate all of the projector's menu system. There are direct buttons for brightness, contrast, and sharpness, plus many more options when using the directional and the ENTER buttons for various manu selections.
The remote for the XW5000ES transmits its control signals using IR (infrared) signal protocols, so as we know it needs to be pointed at the front or rear of the projector to operate, so you must have a direct line of sight to either of the sensors located on the front and back. Most times the projector is located in the theater or media room, so using IR isn’t usually an issue, but in this day and age and at the cost of these high end projectors you’d think they would start using RF (Radio Frequency) remotes that don’t require line of sight for those installations that place the projector in a projection room or Hush Box.
Overall, the remote is relatively small and light which makes it easy to hold and operate. It seems to be built with high quality and sturdy plastic and materials, so it should withstand regular use and maintain functionality and its nice appearance over its lifetime.
Connectivity and ports
The Sony VPL-XW5000ES has the same connections and input ports/jacks as previous Sony SXRD projectors, but now with upgraded HDMI 2.1capabilities.
The various ports on the side of the projector include, from left to right:
LAN Terminal (RJ-45 type)
To connect the projector to your local network for control, etc.
Two HDMI Version 2.1, HDCP Version 2.3 ports
Each capable of 48 Gbps bandwidth
12V Trigger
Outputs 12V DC, 100mA to trigger and control external devices such as an electric dropdown screen or screen masking which also feature a trigger function.
Wired IR Input Port
RS-232 9-pin D-Sub Terminal
To connect a PC or Control System to control the projector
Service Terminal
One USB type-A port for providing 5V power and updating system software/firmware using a USB flash Drive
The onboard control buttons that are used if the remote isn’t available are located on the same side as the input ports. The Standard grounded IEC AC power input port is located on the rear of the chassis.
Picture Modes (SDR & HDR/HLG)
Cinema (Film 1,2)
SDR - Cinema Film 1
SDR - Cinema Film 2
HDR - Cinema Film 1
HDR - Cinema Film 2
What is it for?
These modes are optimized for watching movies.
What does it do?
They give the image a balanced color gamut with deeper, more cinematic blacks and contrast.
How does it look?
It is great for reproducing the cinematic look and experience in your home.
Reference
SDR - Reference
HDR - Reference
What is it for?
Best for reference movie viewing. It is closest to a calibrated reference specification from standards organizations such as the Imaging Science Foundation (ISF), Professional Video Alliance (PVA) and THX.
What does it do?
This mode sets all parameters and options to replicate a reference color and white balance on screen.
How do these modes look?
This mode will look as close to reference as you can get out of the box without paying for a certified calibrator to come to your home to perform a professional video calibration using professional tools and software.
Standard
What is it for?
Best suited for all around, general purpose TV, sports and movie viewing.
What does it do?
This mode makes the projector ideal present content well for a variety of picture content types without having to change modes often based on the content being watched.
How do these modes look?
Standard Mode offers a well-balanced combination of brightness, contrast, and color that is suitable for presenting many different video sources from TV, movies, games, YouTube, etc.
Bright Cinema
SDR - Bright Cinema
What is it for?
Designed for cinematic content like your favorite movies in brighter environments, such as living rooms, media rooms, dens, etc.
What does it do?
The Bright Cinema Mode increases overall brightness. It’s useful for rooms where higher ambient light is present.
How does it look?
The Bright Cinema Mode maintains the accurate colors of the Cinema Mode along with keeping its good contrast, to overcome any ambient light in the room.
Bright TV
HDR - Bright TV
What is it for?
This mode is similar to Bright Cinema, but instead is used for TV and video type content.
What does it do?
Like Bright Cinema Mode, Bright TV Mode increases the brightness but for TV type content instead of movies.
How does it look?
When used in higher ambient light scenarios, it provides a brighter, more vibrant and colorful viewing experience in the face of stray light hitting the screen from overhead and sconce lighting for example. It tries to replicate and look like the normal TV mode when viewed in these types of conditions.
Game
What is it for?
The Game mode minimizes input lag for more responsive first person gaming.
What does it do?
It provides a smoother and more responsive gaming experience than the other picture modes designed for movies and TV where lag and response times aren’t as relevant.
How does it look?
By optimizing the picture settings for reduced lag, it brings out more detail, optimizing the look for color accuracy designed for video gaming.
Photo
What is it for?
As expected, this mode is for viewing photos and content with deep, rich colors with fine details.
What does it do?
Photo Mode enhances details, sharpness and color gamut.
How does it look?
This mode changes its settings applicable to making images more realistic and lifelike, trying to replicate what you’d see in your photo album.
User
What is it for?
This projector mode allows the user to create customized settings for your own personal viewing experience tailored to what you prefer or to a calibrated standard using professional meters and software.
What does it do?
Allows you to adjust and save image settings such as brightness, contrast, color temperature, gamma, etc., that can be tailored to your personal preferences.
How does it look?
This mode can be made to look however you wish it to, because it is based on your individual settings.
3D Performance
The Sony VPL-XW5000ES does not have the needed 3D support or Transmitter dongle port to test 3D. We will be sure to test this feature and update this review if Sony adds the needed hardware or software at some point in the future.
My Before and After Calibration thoughts and chosen Modes
HDR (High Dynamic Range)
Out of the box: Photo HDR10 Mode
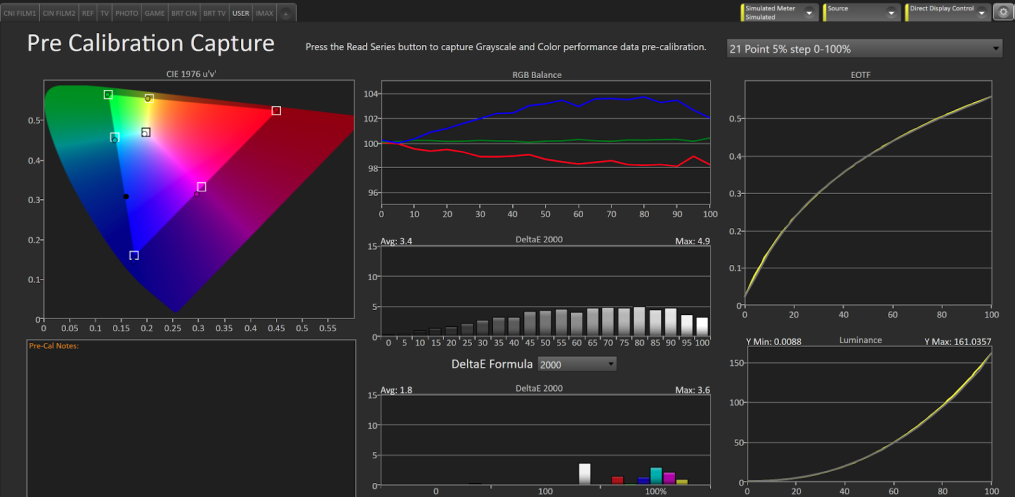
When you measure the Out of the Box settings of Photo Mode, it isn’t the blue-green, cool push that we normally see from most manufacturers who choose to set it cool to get the maximum brightness from the projector along with an initially pleasing picture. The colors are balanced to only about 20% and then they slowly go in the opposite directions as the colors move higher up the “IRE” range towards 100. The blue dips very low after 60% until the end of the scale. Green is at a near perfect reference as it should be. Red rises steadily after 30% and then flattens from 80-100%.
The HDR EOTF starts low and then rises more but still tracks below the reference PQ curve line for the entirety of the curve. This causes a dimmer midrange appearance of the HDR image, lacking brightness and “pop” to the image that you’d get with good flat panel HDR displays.
As is the norm with Sony, their Color gamut tracking measures perfectly at the 50% which can be seen in the Pre-Cal chart below.
After Calibration (Photo Mode, HDR)
After completing grayscale and color calibration, the image of course takes on a more accurate reference quality image that is more pleasing and natural to the eye . The greyscale flattens and the colors fall together in line with all dE’s below any visual thresholds.
The first thing I did was adjust the grayscale using the Color temp controls. The Photo mode was used where the R,G and B Gains and Offsets were adjusted until a near perfect D6500 white balance was achieved.
The HDR PQ EOTF nearly follows the curve perfectly now, with a hard roll off at the upper range to give great pop and brightness in the midrange without peak white highlights being clipped. This results in a crisp, sharp and punchy HDR image.
The colors still tracked the gamut points at 50% as well as throughout the entire color sweep up until about 85-95% (depending on the color) of the DCI-P3 gamut. As usual, the first color to sputter and give up some gamut saturation is Green, which is what typically happens with these blue laser phosphor light engines without color filters, but this is a design choice because they can rob a lot of light output.
SDR (Standard Dynamic Range)
Out of the box: IMAX Enhanced Mode
The XW5000ES’ SDR Pre-Cal results performed similarly to other displays out of the box with the blue being very high as compared to red and green, which is what’s normally seen with a bright, cool image. This was different from my experience with HDR on this projector.
I always run quick, pre-calibration analysis on all SDR Picture modes of each projector. The best of them from Sony is a mode called “IMAX Enhanced”. This mode is the mode I ended up using for my SDR Calibrations.
As you can see in the CalMAN SDR Calibration Workflow Chart below, the colors run within 2% of each other across the RGB range. The colors track consistently in this mode.
You can also see that the luminance tracks the reference yellow curve very well and the colors and its gamut are near their respective target points and not too excessive or over-saturated as you sometimes see with other models trying to wow viewers with bright colors. The measured color points are very close to reference right out of the box.
After Calibration: IMAX Enhanced Mode
I knew after the precals that this was the mode to use for my review and SDR Calibration on this model. With the results of the Pre-Cal showing the aspects very close to reference out of the box such as grayscale, gamma, color gamut, etc. The calibration process was very easy in this IMAX Enhanced SDR Picture Mode, features like the color gamut, gamma and grayscale dropped to their respective reference points easily and gracefully, which can be seen in this Post-Calibration image below. The end result is a nicely rendered SDR image that follows a 2.4 gamma curve which works very well in darkened home theater rooms.
Summing it up
This entry level projector in Sony’s lineup is a great value for native 4K projection. Using Sony’s Reality Creation Video Processing results in a sharp, detailed image with accurate colors that Sony usually sets as the standard. It is more similar to good DLPs with great lenses with razor sharp images and great ANSI contrast. Its HDR performance really pops off the screen with great specular highlights without crushing as long as you use the right DHR curve or tone mapping, either manually in the projector or externally using video processors like a madVR Envy or Lumagen Radiance Pro which can render the perceived HDR image to be near high nit flat panels when viewed in a dark home theater room. As I have said many times, the only thing Sony should do now would be to increase the native contrast of their already great SXRD panels and also add the same dynamic tone mapping they just did in their new higher end models if they want to keep up with the new budget JVC DiLAs.
But if you are looking to buy a native 4K projector that is bright, color accurate, with image pop and a sharp, detailed picture, then take a good look at this still relevant Sony SXRD projector that gives you everything they’re known for, with just a few frills removed to bring it into a price range many should be able to afford!