The image that comes out of a home theater projector is always rectangular. And in a perfect world the image on the screen is also squared. Unfortunately we don’t live in a perfect world and the picture on the screen is rarely the exact shape of the projector screen.
With proper installation and alignment these issues can be easily corrected.
Here are some examples of common alignment and adjustment errors and how to fix them.
Let’s assume you have your regular throw projector mounted inverted on the ceiling.
The picture doesn’t fill the screen

You have two ways to correct the problem of the projected image not filling your screen. You can either zoom in with the projector to make the displayed picture larger or you can move where you mounted the device further from the screen. Obviously using the zoom feature will be a much easier solution.
If your projector can’t zoom in any more and you don’t have room to move the projector further back your screen size may be too big for your room size.
If you’re able to fill the width of the screen but not the height or vice-versa you may have purchased either the projector or the screen with mismatched aspect ratios.
The picture is too big for the screen

This is the opposite issue from not being able to fill the screen and thus has the opposite solution. You can either zoom out or physically move the projector closer to the screen.
The top of the picture is wider than the bottom or the top is wider than the bottom
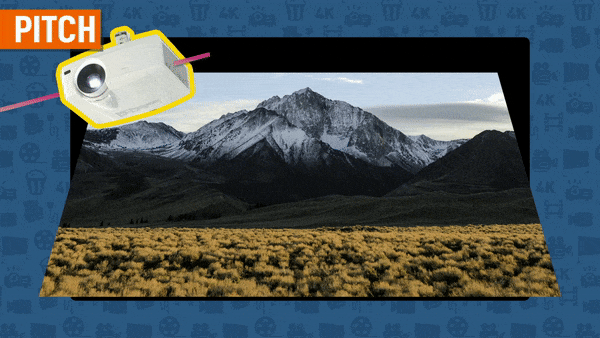
If your image is looking like a trapezoid then the pitch of your projector is off.
If it is wider on top than on the bottom you need to have the projector pitched down in the front.
If the bottom of the image is wider, then it needs to be pitched up at the front.
The picture is slanted

If the image on your screen is slanted it means the projector or screen isn't level left to right. This is caused by the roll of the projector being skewed. To adjust this, make sure your projector is level.
If it's still not perfectly aligned with the edge of the screen, it's possible it's the screen that's not leveled.
One side of the picture is shorter than the other

If the projector is leveled to the screen and the pitch is accurate, but one side is shorter than the other, then the issue is the yaw of the image. To correct this the projector would have to be turned to the right or left until the corner comes in line going too far would shrink the other side. This will make the edges squared off.
Using lens shift

Some projectors have the ability to shift the image into a specific position using lens shift. To do this make the image squared off using the corrections above then lens shift the image into position and zoom in to fill your screen.
Projectors that have lens shift enable you to have flexible placement without needing to be perfectly aligned vertically or horizontally. This can eliminate some of the challenges you would face with the pitch, roll and yaw of the projector.
We always recommend you look for a projector that has lens shift for simplicity of installation.
Keystone adjustment

If none of the steps above are allowing you to have a flat rectangular image, some projectors have digital keystone adjustment to align the picture.
Keystone correction, which is also known as keystoning, is a function on the projector that allows a device that isn’t perfectly perpendicular to the screen to digitally skew the projected image, thereby making it rectangular.
You should try to avoid using keystone correction because it degrades the resolution of the image.
Your projector should now be perfectly aligned
There you have it! All the steps to make sure your projector is properly aligned with the screen. Now you can enjoy a full and immersive cinematic experience.