PROS
- Accurate, nicely rendered colors and skin tones even with its more limited support for only the Rec709 color gamut, reaching only around 77% of DCI-P3.
- Very clear and detailed image for an XPR eShift DLP. It offers a movie-like image unlike some other USTs that overemphasize the colors.
- Features ALPD 3.0, which provides great contrast for this class of DLP.
- Simple, easy to use and understand menu system that isn’t intrusive when taking measurements.
- It is one of only a few UST projectors that supports 3D content.
- Great performance and bright image in such a small, compact, easy to handle design
- Decent sound with its built in speakers, negating the requirement to get a soundbar or external sound system if it isn’t in the budget or you’re taking advantage of its portability.
- Small low profile chassis
- Supports screen size from 65" - 150"
CONS
- Smaller color gamut capability than true RGB Laser UST projectors which support full BT.2020 color gamut, and even smaller than most other blue laser phosphor designs which can reach into the mid 80’s of DCI-P3 color gamut.
- Pretty much all picture modes appear more blue than they should out of the box.
- Limited built-in Smart TV streaming apps.
- Less HDMI ports than other UST Projectors, having only 2.
- IR only remote, needing line of sight. Most other USTs use Bluetooth remotes
Highlights
The first 4K laser UST projector from ViewSonic is an excellent choice at its price point. This ViewSonic X2000B is their very first 4K laser-phosphor light source UST they’ve offered. ViewSonic says this is the second generation of their laser phosphor light engine.
The X2000B has five default picture modes with their own settings. Each one actually has a default image with picture attributes that appear nicely rendered without blown out colors or highlights, nor crushed blacks. Each one also displays the image with correct appearing skin tones, not too red with a sunburn look, or too yellow/green making them look jaundiced or like a Martian. As a single laser projector, you'll notice that it doesn’t show the wide color gamut that we are seeing with the latest discrete 3 laser RGB “Laser TVs”. That said, you will be surprised how saturated and vivid the colors can get despite this shortcoming.
Viewsonic’s specifications show 3,000,000:1 dynamic contrast ratio, but upon measuring the X2000B we get what we typically see from other ALPD UST projectors, near 3000:1 or slightly higher native contrast ratio.
It features a rated 2,000 ANSI lumen output at a 20,000 hour lifespan. It has a very compact, portable, lightweight design. It also supports 3D playback.
The ViewSonic offers two HDMI inputs which are the older 2.0 standard. There is an ethernet port along with Wi-Fi support as well as an audio/headphone connection. It also offers casting/mirroring from your smartphone of choice. This being Android based, you will probably get a better overall experience using an Android phone for this. I couldn’t test this theory though, as I have an iPhone.
It has good image calibration control settings for you to dial in the image to a reference standard, or any image you happen to prefer. It is a pretty simple process when using a meter to get successful results for both grayscale/white balance as well as a decently performing CMS (Color Management System). Each use gets you a good dE close enough to reference as to not be noticeable with the human eye.
The X2000B can be table or ceiling mounted in a front or rear configuration. Most users of these types of USTs mount them in a front table configuration in front of a CLR screen such as the Spectra Vantage. It can be used on the 100”, 120” or even the new 150” versions of this screen. For my calibrations and review, I used the floor rising Vividstorm 120” CLR model.
The X2000B’s MSRP is $3,099 but is seen being offered at a lower price points at some authorized resellers, such as projectorscreen.com.
Aesthetics
ViewSonic has taken a different approach to the design of this little UST. It is utterly small in comparison to most others. It has a rounded barrel speaker horizontally across the front, covered in matching fabric. It almost looks like it is a glued on, charcoal colored pool noodle, haha!
The chassis has rounded corners and is not very tall. It features a matte, charcoal black color, which to me and many other UST owners is the preferred color if only one choice is given. All the connectors are on the back, with a power button on the top right.
The sides of the X2000B projector have a louvered and slotted design to help keep the unit cool with its internal fans which suck in from one side and blow out the hot air from the other, as most projectors should have.

Installation, Throw Ratio, Zoom:
Throw Ratio
Lens Shift
Keystone/Warping Adjustment
4 Corner Keystone (Top Left/Right, Bottom Left/Right)
 Multi-Point Warping using a 60 point grid. Used to map image to non-square surfaces, such as a cylinder or sphere.
 4 Corner Keystone Adjustment will be
disabled if Warping is enabled.
Installation and Placement Guide
There is an included projector distance card that can be used to measure the distance for placement to your desired image size.
The X2000B has two adjustable front feet that work in conjunction with the stationary rubber back foot in the center. I prefer using four feet in each corner for maximum adjustment flexibility. Adjusting the feet changes the projector’s front height and subsequently the vertical projection angle on screen. If your screen and projector are on flat and plumb surfaces and perpendicular to each other then there shouldn’t be much adjustment needed here.
Projector to Screen Alignment
The most important thing for USTs is the physical setup initially before using any digital adjustments at all, which should only be used as a last resort in extreme cases.
Move the projector back and forth to adjust the size of the projected screen to be smaller and inside the screen borders
Move the projector to the left or right to adjust its angle and use the angle adjuster feet to make the screen rectangular.
Move the projector back and forth again to adjust the screen size to fit within the frame borders.
Projector Focusing
Like most other UST projectors that feature electronic focusing, there’s an adjustable, motorized focus mechanism in the X2000B. It’s very easy to adjust the focus on screen sizes between 65-150”.
To access the focus control and adjust the clarity and sharpness of the image, you start by pressing the focus button on the remote, then you use the left and right buttons to adjust to the clearest setting for your installation.

Lens Zoom
- N/A. USTs are fixed zoom and rely on physically moving the projector forward and backwards to make their images smaller and larger.
Laser Light Source
Like many other single chip DLPs, the X2000B uses a blue laser phosphor light engine paired with a yellow infused phosphor wheel and a color wheel. It has the typical life expectancy of around 20,000 hours. This is dependent on the laser power and modes used throughout its lifetime.
Brightness
This UST projector has a spec’d brightness of 2,000 ANSI lumens. This is a bright enough figure that if you pair this diminutive UST with a CLR (Ceiling Light Rejecting) Screen, it should act as a nice replacement for a standard flat panel type TV in all but the harshest room lighting environments.
When you turn the lights off in the same room at night, or in a dedicated, light controlled environment such as a dedicated theater space, the image projected from this little beauty renders much better colors with more depth and details you can see into the darker shadows not being washed out by the ambient lighting in the room. The X2000B projector has a very celluloid and cinematic film type image along with the good inter-image contrast DLPs are known for. This usually results in more deep, sharp, and detailed almost 3D images, especially with movies. A standard white screen may be your first choice if you plan to install this in a dedicated, light controlled theater room, but just be sure to use a screen with a small bezel/frame that doesn’t get in the way of the projected image coming at extreme angles from the projector at the bottom!
|
Brightest Mode |
TV Mode |
Movie Mode |
Gaming Mode |
User Mode |
HDR (Peak Center Lumens) |
1,936 |
1,679 |
1,824 |
1,942 |
1,858 |
SDR (Peak Center Lumens) |
1,938 |
1,677 |
1,820 |
1,945 |
1,863 |
Color Gamut
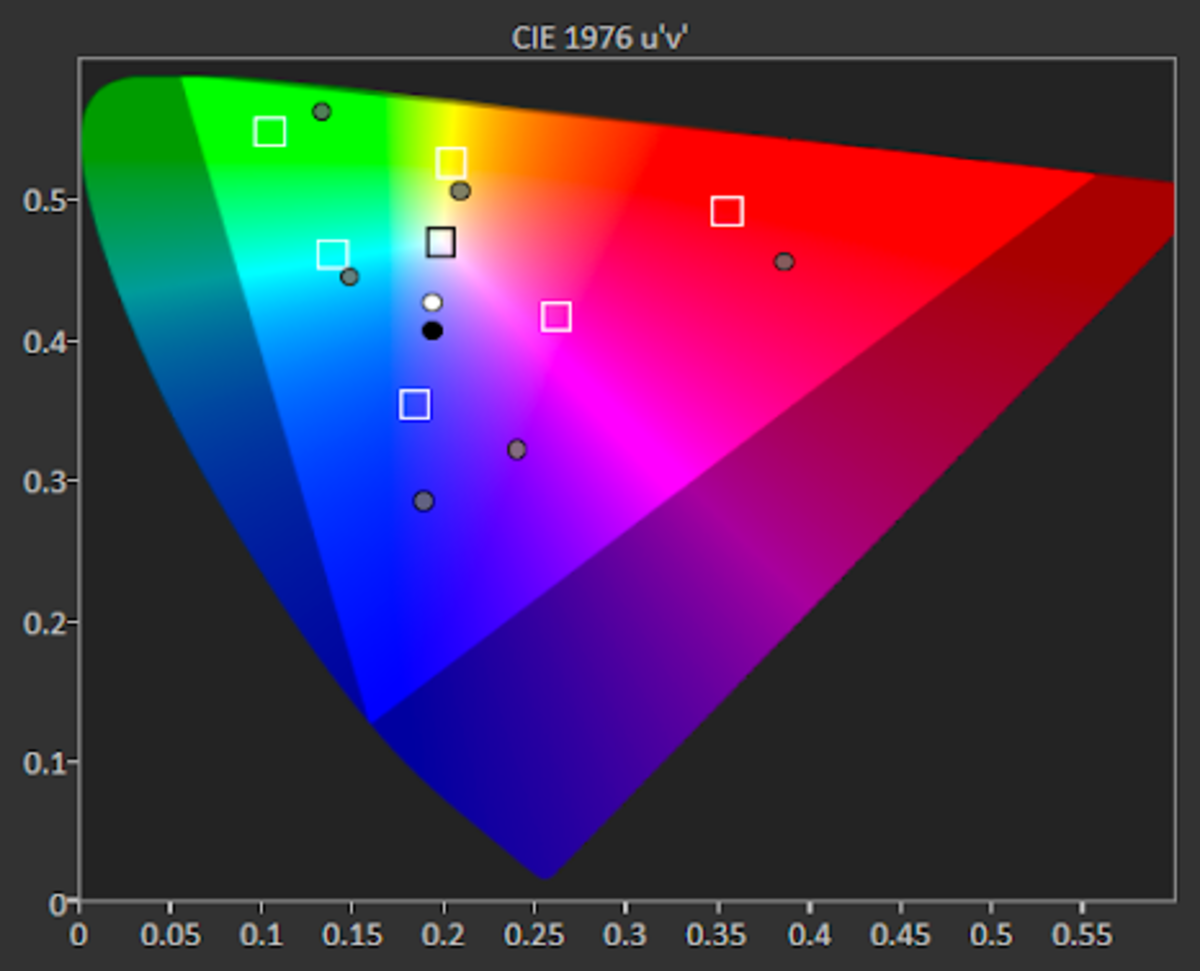
The Viwewsonic X2000B uses a blue laser phosphor light source along with yellow phosphor and color wheels to create its color on screen. This allows it to achieve full Rec709 color space, but not anywhere significantly close to the DCI-P3 gamut used for pretty much all 4K HDR video services. Other competitors using blue laser phosphor must have a different color wheel with DCI-P3 color segments, such as the BenQ V7050i, because they seem to achieve much closer to the P3 gamut than the V2000B does.
HDR DCI-P3 Color Gamut
 Brightest Mode
 TV Mode
 Movie Mode
 Gaming Mode
 User Mode
HDR BT.2020 Color Gamut, 50% Saturation:

Contrast
The ViewSonic X2000B UST laser projector is marketed at a staggering 3,000,000:1 contrast ratio, but we all know this is a marketing tool exaggeration. Even with such a ridiculous contrast claim, the black levels and contrast that this projector produces are as good as or better than most other UST DLP projectors available in the market today.
Measurements were done using CalMAN calibration software with a SpectraCal CA-6 colorimeter and a SpectraCal VideoForge Pro test pattern generator on a 120” Vividstorm CLR Screen, with the meter facing the screen.
Full On/Full Off Contrast Ratio:
Brightest Mode |
TV Mode |
Movie Mode |
Gaming Mode |
User Mode |
2,762:1 |
2,597:1 |
2,300:1 |
2,769:1 |
2,722:1 |
Sharpness, Detail, Clarity
Sharpness in displays is usually a rudimentary edge enhancement processing feature which, if not done well, can result in severe edge outlining, especially on straight lines and the outlines of objects in the image. This is known as “ringing” or “haloing”, as can be seen in the below examples. Very few manufacturers and displays do sharpness in a helpful way which makes the image appear to have more detail or sharper lines without distortion. A good example of doing it right would be DarbeeVision, which if used judiciously makes the image appear more detailed, 3-dimensional and with more contrast without causing white lines (ringing) around objects. Sony’s Reality Creation is that and so much more.
The X2000B has a good lens and optical system. It produces a detailed image with depth and sharpness to bring out the detail of even the highest resolution videos you may throw at it. Coupled with the good native contrast of its ALPD 3.0 engineered optical system, the inter-image perceived contrast gives it a depth to the image that makes up for some of its color gamut shortcomings. The focus is very sharp and it doesn’t look like it is enhanced digitally via its sharpness setting or internal processing. No matter the type of images you send to it, be it from UHD Blu-ray, UHD streaming or even Over-the-Top and cable TV, it provides you with a level of dimensionality and realism. It takes on an almost 3D depth to the image in many scenes with mixed content. The cinematic, celluloid, film-like look to it, when paired with its inherent sharpness and clarity, gives this X2000B a very nicely rendered image in your home theater or living room.
Motion Handling
The ViewSonic X2000B projector has motion processing built in. It is called “Frame Interpolation” in the menu. It does this by interpolating frames from video sources such as movies at 24p to its native 60p. It does this motion with no “ghosting” type trails behind any objects in motion and with minimal blurring in motion. Some good examples are sports and action moves with horizontal motion from side to side, like with football, hockey and basketball as the camera pans horizontally and during car chase type action scenes in movies as cars fly by horizontally across the screen and the camera pans along with them.
The X2000B’s Frame Interpolation (also called MEMC for Motion Estimation/Motion Compensation on some displays), is something you can use if you find this projector’s native motion unsatisfactory. There are three levels to choose from, LOW, MID and HIGH. When watching movies I didn’t find it good enough to use because I don’t like any sort of soap opera effect, especially when watching movies! I did see a decent difference and possible worth with normal TV watching though. I would use the LOW setting with these sources to avoid any SOE, unless you don’t mind this controversial feature.
Imaging Technology/Chipset
The ViewSonic X2000B is using the Texas Instruments 0.47 inch DMD DLP chipset, as opposed to the 0.67 inch DMD chipset being used in some of its higher cost and larger chassis competitors. This chip is used in conjunction with the XPR eShift vibrating optical glass configuration to allow pseudo 4K UHD rendering of the pixels on screen. This is what most of the USTs on the market are using and is a common imager configuration in this price and model class.
Gaming Input Lag
The X2000B has a dedicated Gaming Mode as one of its selectable picture modes. This mode will disable the projector's processing as much as possible to provide the lowest latency response possible for this projector, which is in the range of about 40 ms. For the serious competitive gamer, the input lag may be considered a tad too high at this level in its Gaming Mode. A latency around this level usually doesn't affect casual gamers as much. These types of gamers do it more for a good time, probably with friends, like most of the general population. If you are into competitive gaming, like a first-person shooter type game, you may experience it being a little too unresponsive to be as competitive as you need to be at this latency speed.
The X2000B displays the gaming graphics amazingly well though. It shares the same look and feel of the other modes used for TV and movies, which is a very organic film-like look with natural, although limited, colors when compared to its competition. This quality makes it a good UST to use with fun games that don't require a very low input lag to enjoy yourself and to remain competitive.
Built-In Sound
This ViewSonic UST incorporates a Harman Kardon speaker system. It has 50W of two channel power, each channel with the usual tweeter and mid-bass drivers where this power is shared. It is capable of decoding both DTS and Dolby Digital sound formats, which is good because most only support the Dolby Digital format. The front of this little ultra short throw DLP has a strange rounded, cylindrical black fabric covered sound bar that hides the pair of speakers.
The audio reproduction coming from this small UST is decent enough to use on its own and justifies its 50W power rating. It won’t give you the visceral feel and experience of an expensive sound bar or audio system, but it is what it is and what it was designed for, which is it sounds good enough as a TV replacement designed for a living, play or media room or when it is taken out and used as a portable entertainment system at a friend’s house or the backyard movie nights we all enjoy during the warm weather months. It at least doesn’t force you to purchase and use expensive sound bars or a full 5.1 or larger surround sound system. Of course utilizing those devices are definitely better than what you get built in on the X2000B, if your budget is there to go with the Viewsonic. You can use the ARC feature of this UST to connect your sound bar or external audio system.
 Sound by Harman Kardon
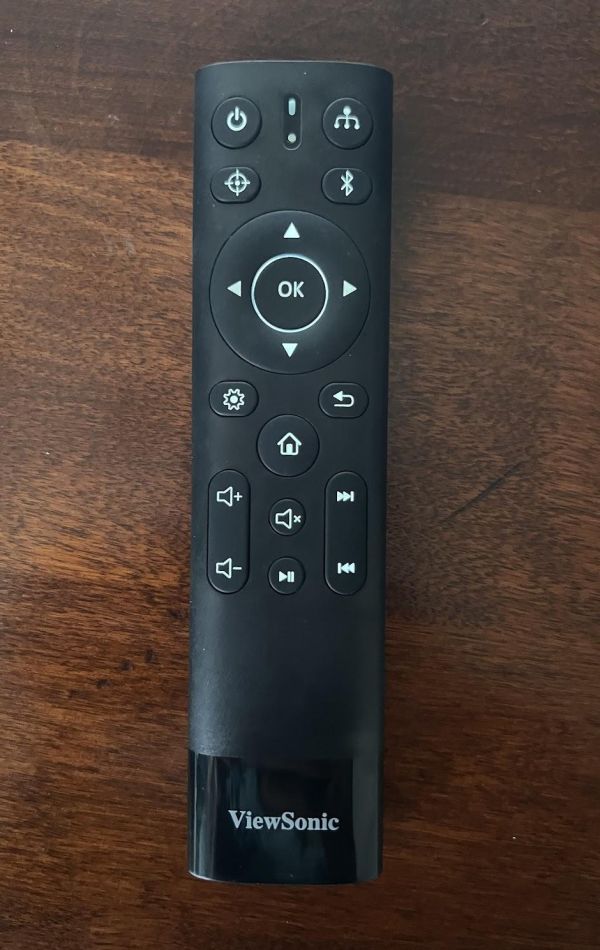
Projector Remote
The provided remote with the V2000B is a nice one. It has a cool motion sensing design so that when it is moved at all, like when it is picked up, it lights up the buttons so you can see them easily in the dark. It has a nice weight to it and it sits nicely in your hand, with all the buttons within reach of your thumb. The center circular ring navigation controls are raised and rounded so it is easy to feel and use without looking at it. All the buttons have a tactile feel and click so you know when they are pressed.
It has all the buttons you’d need to work normally on a day to day basis. It has a dedicated button for focus, Bluetooth and input, along with the normal settings, home, back, volume +/-, mute, play/pause, chapter +/- and power on/off.
The only gripe with this remote is that it is IR only so you have to point it directly at the projector for it to respond with any sort of consistency. This turned out to be a minor source of frustration while doing my calibrations with CalMAN, as I had to keep pointing directly at the front with many times the projector not responding to button pushes, causing me to have to push buttons many times for it to register. Most if not all other USTs use Bluetooth remotes so you’re not limited to line of sight. It is said that they will phase in a Bluetooth remote in the future, but we will see.
Streaming Applications
This projector has integrated apps which, like other USTs, are built into the unit. They are included in the projector’s “Apps Center”. This lets you stream from the most popular streaming services including Netflix, but using it was an effort in futility when compared to using Netflix on dedicated stream devices.
As with most of these USTs that we review, we almost always recommend using external stand alone streaming boxes for the best performance and most up to date versions of the various apps. The only exception would be those based off of AndroidTV without major reconfiguration, although even then you are at the mercy of the projector manufacturer to employ any new updates.
User Interface and Menu System
The user menus are setup and look quite different than other UST projectors I have reviewed. Luckily it has quite a few different options and selections that you can use to tailor the image and response of the X2000B the way you want. It is pretty easy to understand and after a few minutes playing with it and perusing the menus, you should feel right at home when using the remote to navigate through the various options given. There are two different menu trees that you will use, Image Settings and Advanced.
Connectivity Ports

- The X2000B has two HDMI 2.0 inputs, of which HDMI-2 supports ARC
- 2 - USB (5V/1.5A Out) USB 2.0 Type A port (One Rear, One Side)
- 1 - AC IN socket
- 2 - HDMI 2.0/HDCP HDMI ports (HDMI 2 Supports ARC)
- 1 - Audio signal output socket (3.5 mm jack)
- 1 - AV IN (3.5 mm jack) Audio/Video signal input socket (Use supplied A/V adapter)
1 - LAN RJ45 LAN port
Picture Modes
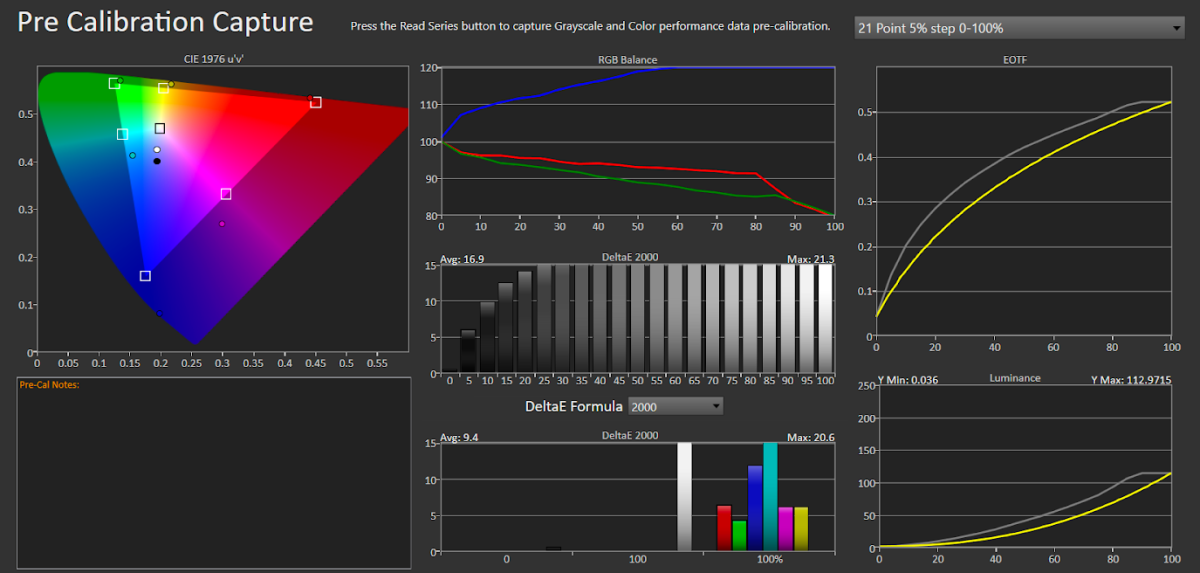
The five modes that this X2000B employs are the same whether you are watching SDR or HDR. They are Brightest, TV, Movie, Gaming and User. They all have similar appearances out of the box, all being too blue as usual with most displays. The User seemed to be the closest mode to any sort of reference, but you can use the calibration controls provided to get them all close. I am sure this is a design choice for use in brighter living room environments.
Brightest
- Best for bright environments such as board rooms, rooms with many windows or light fixtures. Graphic presentations to highlight colorful charts, Slideshows, etc.
- It boosts up the peak brightness and over saturates the colors to make them “pop” in bright rooms.
- Looks overly bright and peaked with vibrant, unnatural colors.
- This mode has a very blue image that gives it the most cool appearance. On the X200B, you can use this mode as a nearly reference viewing mode with a little tweaking from the calibration controls to give you maximum brightness for viewing in high ambient light situations or if you want that extra punch it gives with HDR.
TV
- Best for rooms with more subtle ambient light, such as sconces on dimmers, but nothing too overpowering that would wash out the screen. Good for non-critical movie, sports and TV watching, where you may want some ambient light to multitask or to interact with other people.
- This mode basically just boosts up the blue even more to give a more cool looking presentation that is more pleasing to the eye, and also helps overcome the small amount of ambient light. Black levels may be slightly elevated, or appear to be due to the gamma used as well.
- Looks similar to the other modes, but with a cooler, more blue image giving higher brightness, to help alleviate the effects of room lighting. It has a more natural tone to it than Brightest Mode. Gamma and PQ are a lower value, usually 2.0 or 2.2 and the curve rolls off earlier as well.
Movie
- This is the mode usually saved for the serious home theater enthusiast who watches in a dedicated, light controlled blacked out room and wants the image to be rendered as close to the film maker’s intent as the manufacturer allows.
- This is a tad closer to D65 than the TV Mode in its image appearance and the look of its colors and grayscale before any calibration, and the laser is slightly higher power, probably to help with HDR movies. Usually, any Movie or Filmmaker Mode is supposed to preserve the creative intent of the content creator as close as possible out of the box.
- This mode should defeat all processing in the projector and is supposed to be calibrated closest to the standards, without being overly bright or clipped in either the high or low ends of the spectrum.
- This mode usually looks more “celluloid and film-like”, to some seeming flatter and less dynamic in its default settings. It is normally the least bright of all the modes. Colors tend to be more muted than other modes, but in reality are closer to the standards, which most are not used to being exposed to, which many don’t initially prefer.
Gaming
- As the name implies, it is for the gamer wanting the lowest possible lag times for video games.
- This Mode defeats the processing in the projector as much as possible to avoid any delays in the time it takes a frame of video to get from the game console to the screen, known as latency.
- This mode looks similar in its appearance to the other modes except User, but it defeats most/all processing “features” and is more for critical game playing.
User
- Allows and recalls the settings you can customize based on your personal preferences, or calibrated values.
- This is a user-definable mode to use if any of the available picture modes are not suitable for your needs.
- You can use one of the other built-in picture modes as a starting point and calibrate those, or you can use this User Mode to customize your settings.
- User Mode is the closest to reference out of the box.
HDR (High Dynamic Range)
Out of the box
No matter the mode being used for HDR, you can see the out of the box blue push to the image, making it look more cool than it should be based on reference. Each of the primary colors appear to follow each other across the grayscale linearly, but the blue is higher than green and red across the entire range. The EOTF tracks the curve but is on the low side, so you have to make sure to go in and use the HIGH EOTF setting. There are three of these EOTF settings, LOW, MID and HIGH. User Mode is the only one that is pretty much following the HDR EOTF.
 Gaming
 User
User
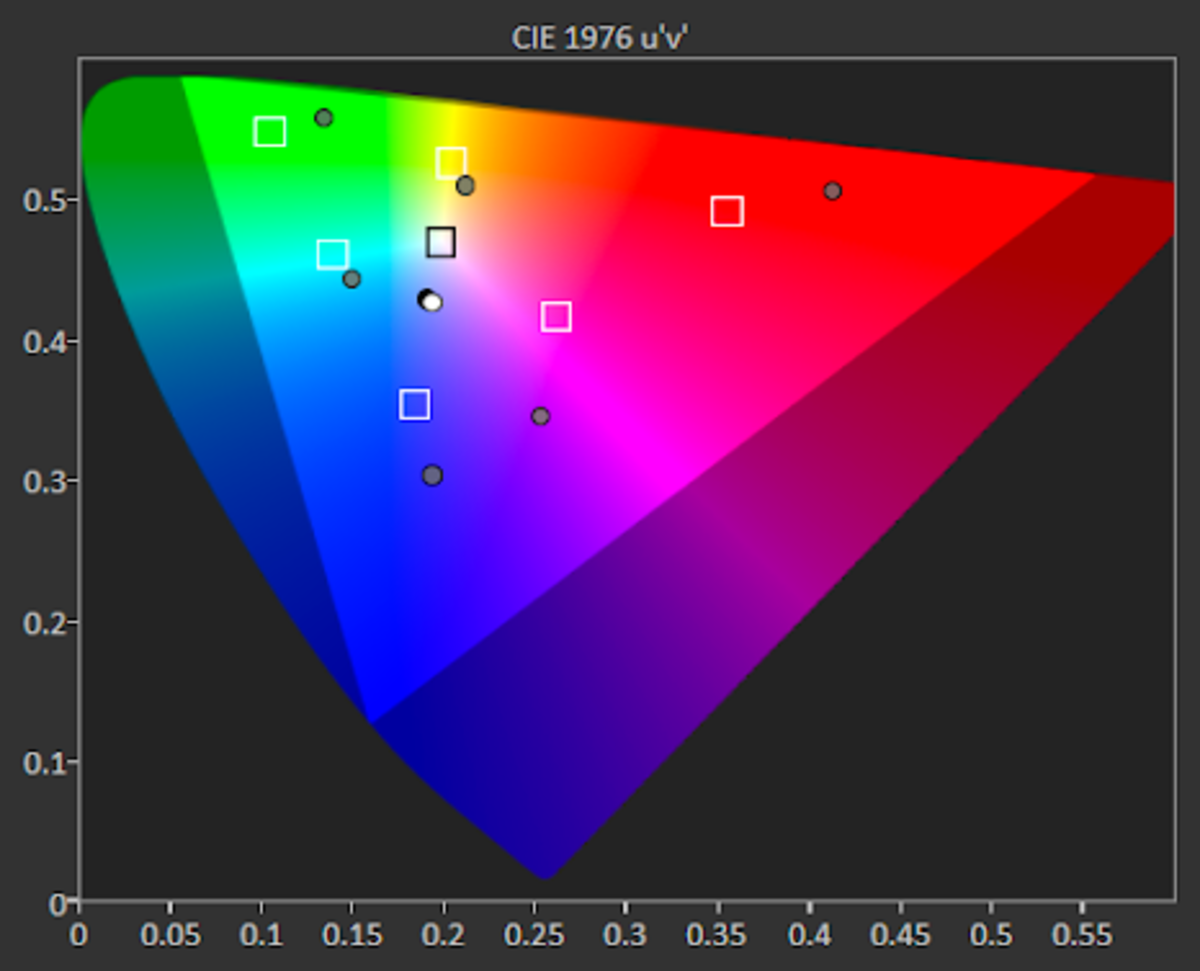
After Calibration (User Mode)
As should be the case, after a good calibration the image is more accurate and closer to reference. The D65 white point lands squarely in its proper box. The color gamut using the 50% points are relatively accurate for all colors except green and red, which can be normal when using a blue laser with yellow phosphor since the red and green are derived from splitting the yellow into its two primary components, red and green. This is a compromise to using true Red, Green and Blue lasers as most other higher end USTs use nowadays. This results in lower gamut coverage and possible inaccurate colors. The reason the 50% points are off is because I made sure to have the lower points track properly, which is more important than just setting the peak gamut points and having your tracking be off.
Grayscale also tracks well, just showing the normal glitch in the 50-60% range where the “knee’s” tone mapping starts to take effect. Overall it tracks where it should in the low and high levels.
The EOTF PQ curve starts out a tad high at the bottom end due to the normal elevated black floor (0.0571 nits) of DLPs compared to the likes of JVC’s LCoS projection technology. The X2000B’s curve is slightly low throughout the range, resulting in a flatter appearance. This is with the HDR EOTF set to HIGH, so you can’t go any higher. I attempted to correct it in the calibration controls but this caused other issues that weren’t worth the trade off. When watching regular HDR content, this didn’t seem to have an effect on the overall image as it was still bright and punchy with a normal “HDR look” to it.
User Mode (Cal’d):
My primary devices for HDR evaluation are an AppleTV 4K Gen 3, an Oppo BDP-203 and a Tascam BD-MP4K Professional UHD Blu-ray player. The X2000B reminded me a lot of the BenQ V7050i but with a little smaller color gamut. The HDR coming from those devices, like the BenQ, has a cinematic, filmlike image with a very celluloid appearance. For watching movies, you’ll like the characteristics that this projector shows, similar to the V7050i as mentioned.
My usual go-to’s for testing HDR material on projectors are some various UHD Blu-ray and some specific scenes in them. Some examples of the movies and scenes I used to test this ViewSonic UST are The Meg (Chapter 8, overturned boat scene), Aquaman (Chapter 6, Aquaman in chains), Harry Potter and the Goblet of Fire (Chapter 26, magic wand fight with Voldemort) and 1917 (Chapter 13, dark stairwell scene). These scenes represent some of the best peak white and dark shadow detail scenes of any movies released in the UHD format to date.
The ViewSonic X2000B handles these scenes with aplomb! Especially the scenes with dark shadows such as the Harry Potter wand battle with Voldemort and the 1917 scene after George Mackay’s character gets knocked out after falling down the steps and awakes in the pitch black stairwell. These are very tough scenes to render for any HDR TV and especially projectors that can’t get near as bright as their TV counterparts. This means a lower dynamic range than you can get with very bright HDR flat panel TVs, so the attributes that suffer the most and are easiest to spot are the low level and peak white details. The X2000B, despite being a DLP projector which are known to be the worst with native on/off contrast, shows the dark scenes with a lot of shadow detail visible. What you’ll notice is elevated black floor and a little more gray haze than you’d get with a top contrast performing projector such as the JVC D-iLAs, but unlike many other projectors, UST or otherwise, that I have had the pleasure of reviewing and evaluating, this one doesn’t crush those shadow details into oblivion (No, not the Tom Cruise movie!).
The big drawback of this UST’s HDR performance is the fact that it is a single blue laser phosphor design and it is not able to do full DCI-P3 colors, or even close really. It doesn't even quite reach full Rec709 when calibrated to follow the lower points of the color gamut sweeps faithfully. This is pretty hard to notice in most scenes, but when you’ve seen some of these new triple laser USTs, especially as much as I have, you will start to notice the colors just aren’t as punchy and vivid at times when called for and it does take a little away from the entire HDR experience. Regardless, the image with HDR is extremely sharp, crisp and detailed with this little powerhouse!
There are five picture modes on the X2000B and they are shared for both SDR and HDR. The modes again are: BRIGHTEST, TV, MOVIE, GAMING and USER. It appears that the only thing that changes between the HDR and SDR modes is the gamma being used, either a power law gamma such as the selectable values like 1.8, 2.0, 2.2, 2.4, 2.6, etc., or the usual ST2084 PQ absolute “gamma” curve for HDR. There are three dedicated curve types to choose from on the X2000B, LOW, MID and HIGH. I found that the HIGH setting was the one that most closely followed the reference PQ curve in CalMAN.
SDR (Standard Dynamic Range)
Out of the box
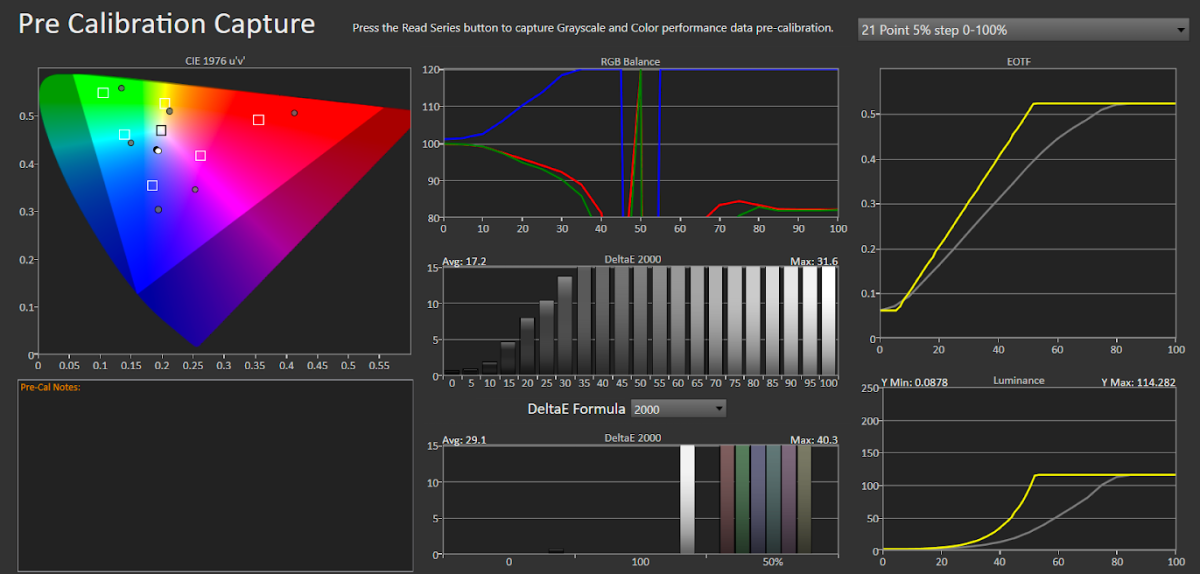
The SDR performance out of the box is similar to most all other displays and projectors, being way too blue in its default modes. The only mode that wasn’t extremely far out of reference was the USER mode, with its RGB Balance within 10% and its EOTF has a slight bump in the midranges, which is probably intentional to help boost these levels in high ambient light situations where these USTs are usually used. The D65 white point was also the closest of all modes out of the box. The next closest mode was the MOVIE mode, but I decided to use the USER mode to proceed with my calibrations and evaluation of the SDR performance of the X2000B.
I ran through all the modes before doing any adjustments, and this is what I measured:
 Gaming
 User
User
After Calibration
After the User Mode calibration, as usual the reference points come closer to their intended targets, except for a slight “giddyup” at the high end of the grayscale range between 90-100%.. The green and blue are about 3% high at their peak and red is around the same percentage below its reference at 100%, but this is intentionally done to keep the white balance in line across the rest of the grayscale range, which is more important to have overall than just getting the extreme high end perfect. With something like an 11 or 21 Point White Balance I am sure we could have gotten them all perfect. The gamma follows the curve nicely as far as its shape goes, but it is slightly low in the beginning which can make the image appear darker and more crushed in the low areas, but then it transitions to ever so slightly higher in the midranges before meeting the reference line again at its peak. This results in rendered images inside 20 and 90% to be a little hot and boosted, but as mentioned in the HDR section, this is most likely done on purpose to give the main parts of the image a little boost to help overcome any ambient light in the environments that these projectors are normally installed in.
Summing up the ViewSonic X2000B
Wrapping it up, ViewSonic has made some questionable decisions when they designed this spunky little UST. I am not sure why they decided not to use an RGB laser source when so many other USTs that have come out feature this sought out, high end light engine. Not only that, unlike other Blue Laser Phosphor light engined units such as the aforementioned BenQ LK990, the X2000B doesn’t even quite reach full Rec.709, let alone anywhere close to the 90% DCI-P3 color gamut that is called for from the UHD Alliance to qualify as a wide color gamut device. The only reason I can think of to make this decision is so they could get the brightest possible image by using a different color wheel with lighter color segments to allow more light through as a trade off to get more lumens to the screen, similar to what classroom or business projectors use to overcome light coming from ceiling lights and windows, which a lot of USTs are installed into similar environments.
Even given this oversight, I can honestly say that ViewSonic really does have a good performing UST here. It's done its job being a decent television replacement for your living room or another room in your house that may have some ambient light pollution. It has decent colors for what they are and that are both bright and saturated. It gives you a celluloid look and film-like, cinematic image. One good side effect of its light engine is it shows video on screen without being too overly saturated with a cartoonish image as many other true RGB Laser USTs tend to do.
It also has a lot of features for setup and calibration which you usually won’t find on many other projectors out, especially ultra short throws. Many use the AndroidTV platform and are too cheap to pay for the licensing to include calibration controls such as a working Color Management System (CMS), proper white balance/grayscale in at least a 2 point control but preferably 11 or more points.
With so many RGB laser Ultra-Short Throw projectors coming out constantly, the ViewSonic X2000B even with its “so yesterday” blue laser phosphor light source and “antiquated” color wheel, it in some ways surpasses a lot of these in a lot of other ways by including support for 3D, which many don’t, pretty good lag times for the gaming folks amongst us, all in a package that is more affordable than most.
Like the similar BenQ V7050i during ProjectorScreen.com’s Laser TV Showdown, this tiny little UST caught the eye of almost all of the judges and garnered many a “wow, this thing is pretty darn good and the black levels really shine, especially for a business projector manufacturer such as Viewsonic”! In this budget range you’d do yourself a disservice if you don’t include this great UST on your short list!
Specs
Projector Resolution: | 4K |
Brand: | ViewSonic |
Product Status: | Leaves Warehouse within 3-5 Business Days |
Lumens: | 2000 |
Projector Type: | Ultra Short Throw |
Light Source: | Laser |
Contrast Ratio: | 3,000,000:1 |
Chipset: | DLP |
Aspect Ratio: | 16:9 [HD] |
Throw Ratio: | 0.22:1 (D:W) |
Native Resolution: | 3840x2160 |
Input Lag: | 4K/60Hz: 40.8ms| 1080p/60Hz: 37.2ms |
3D Support: | Full HD 3D |
Built-In Speaker: | Yes |
Warranty: | 3 Years |
Standard Lens Focus: | Motorized |